Tutorial Aims:
- Get familiar with version control, git and GitHub
- Create your own repository and project folder structure
- Sync and interact with your repository through
RStudio - Sync and interact with your repository through the command line
1. Get familiar with version control, Git and GitHub
What is version control?
Version control allows you to keep track of your work and helps you to easily explore the changes you have made, be it data, coding scripts, notes, etc. You are probably already doing some type of version control, if you save multiple files, such as Dissertation_script_25thFeb.R, Dissertation_script_26thFeb.R, etc. This approach will leave you with tens or hundreds of similar files, making it rather cumbersome to directly compare different versions, and is not easy to share among collaborators. With version control software such as Git, version control is much smoother and easier to implement. Using an online platform like Github to store your files means that you have an online back up of your work, which is beneficial for both you and your collaborators.
Git uses the command line to perform more advanced actions and we encourage you to look through the extra resources we have added at the end of the tutorial later, to get more comfortable with Git. But until then, here we offer a gentle introduction to syncing RStudio and Github, so you can start using version control in minutes.
What are the benefits of using version control?
Having a GitHub repo makes it easy for you to keep track of collaborative and personal projects - all files necessary for certain analyses can be held together and people can add in their code, graphs, etc. as the projects develop. Each file on GitHub has a history, making it easy to explore the changes that occurred to it at different time points. You can review other people’s code, add comments to certain lines or the overall document, and suggest changes. For collaborative projects, GitHub allows you to assign tasks to different users, making it clear who is responsible for which part of the analysis. You can also ask certain users to review your code. For personal projects, version control allows you to keep track of your work and easily navigate among the many versions of the files you create, whilst also maintaining an online backup.
How to get started
Please register on the Github website.
On your computer, you need to install Git first. The process will depend on your operating system: please follow the instructions below by clicking the relevant button.
Linux
If you are using a Linux distribution, you can usually install Git by running the following command in the Terminal:
sudo apt-get install git
If this doesn’t work, look up Git installation instructions for your distribution.
Windows
If you are on a personal Windows machine, download and install Git for your operating system. Below are some recommended installation instructions, to keep things simple. However, if you know what these options do, and want to change them to suit you, go ahead:
- For “Select Components”, check:
- “Git Bash Here”
- “Git GUI Here”
- “Git LFS (Large File Support)”
- “Associate .git* …”
- “Associate .sh …”
- When prompted to choose the default editor, pick Notepad or if available, Notepad++ (a free graphical text editor designed for coding you can download here).
- For “Adjusting the name of the initial branch in new repositories”, select: “Override the default…” and write in “main”.
- For “Adjust your PATH environment”, select: “Git from the command line and also…”
- For “Choose HTTPS transport backend”, select: “Use the OpenSSL library”
- For “Configuring the line ending conversions”, select: “Checkout Windows-style,…”
- For “Choose the default behavior of
git pull”, select: “Default (fast-forward or merge)” - For “Choose a credential helper”, select: “Git Credential Manager Core”
- For “Configure the terminal emulator …”, select: “Use MinTTY …”
- For “Configure extra options”, select:
- “Enable file system caching”
For any configurations not listed here, select the default option.
macOS
If you are on a personal Mac machine, install Git via Homebrew, which is a package manager for command line programs on Mac. First, open a terminal, which can be found at ~/Application/Utilities/Terminal.app. Then, copy and paste this line into the terminal and hit “Enter”:
/usr/bin/ruby -e "$(curl -fsSL https://raw.githubusercontent.com/Homebrew/install/master/install)"
Now enter the following to install Git:
brew install git
Follow any instructions in the terminal window, you may need to enter your Mac’s password or agree to questions by typing yes.
The files you put on GitHub will be public (i.e. everyone can see them & suggest changes, but only the people with access to the repository can directly edit and add/remove files). You can also have private repositories on GitHub, which means that only you can see the files. GitHub now offers free private repositories as standard with up to three collaborators per repository. They also offer a free education package, with access to software and other perks, you can apply for one using this link.
How does version control work?
What is a repository?
You can think of a repository (aka a repo) as a “main folder”, everything associated with a specific project should be kept in a repo for that project. Repos can have folders within them, or just be separate files.
You will have a local copy (on your computer) and an online copy (on GitHub) of all the files in the repository.
The workflow
The GitHub workflow can be summarised by the “commit-pull-push” mantra.
- Commit
- Once you’ve saved your files, you need to commit them - this means the changes you have made to files in your repo will be saved as a version of the repo, and your changes are now ready to go up on GitHub (the online copy of the repository).
- Pull
- Now, before you send your changes to Github, you need to pull, i.e. make sure you are completely up to date with the latest version of the online version of the files - other people could have been working on them even if you haven’t. You should always pull before you start editing and before you push.
- Push
- Once you are up to date, you can push your changes - at this point in time your local copy and the online copy of the files will be the same.
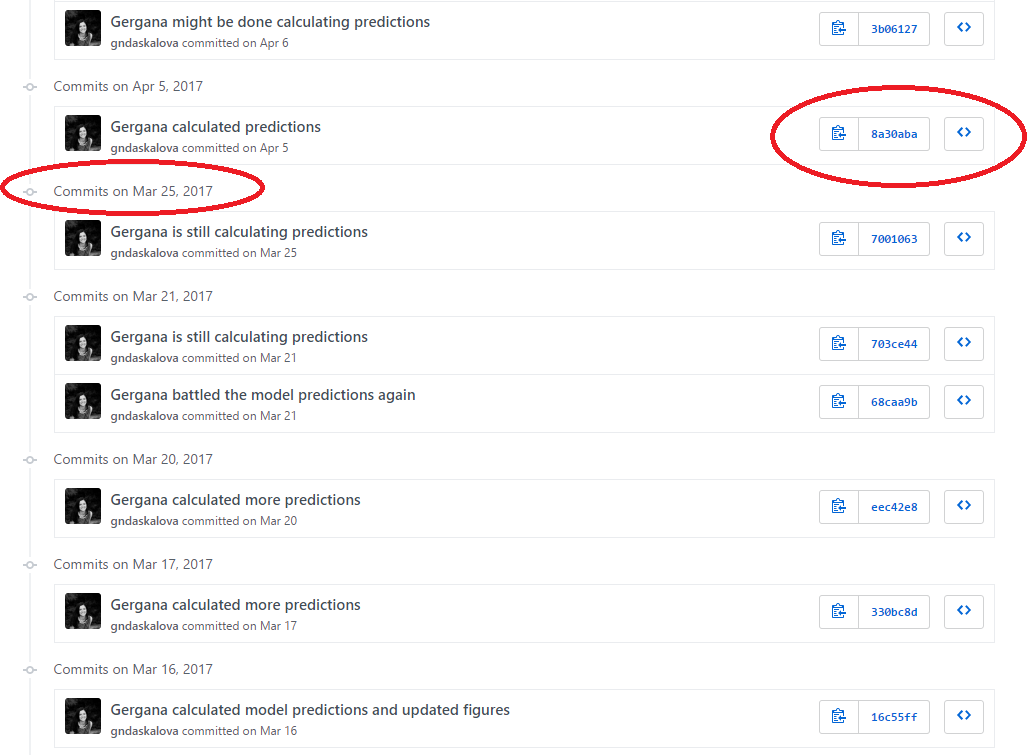
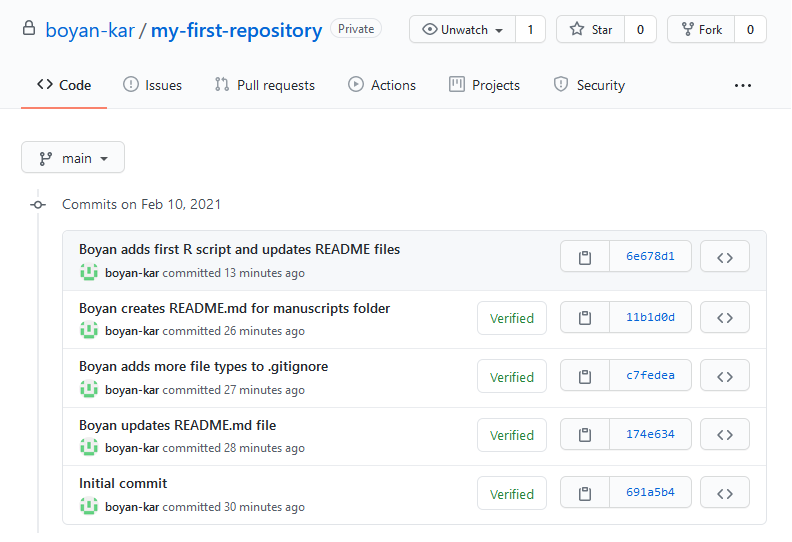
Each file on GitHub has a history, so instead of having many files like Dissertation_1st_May.R, Dissertation_2nd_May.R, you can have only one and by exploring its history, you can see what it looked at different points in time.
For example, here is the history for a repo with an R script inside it, as viewed on Github. Obviously it took me a while to calculate those model predictions!
2. Create your own repository and project folder structure
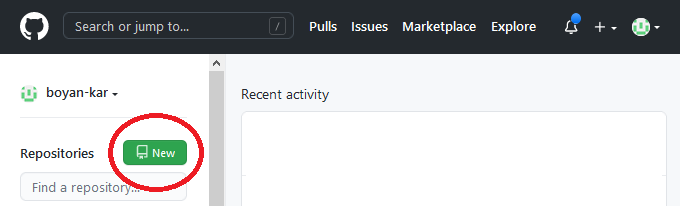
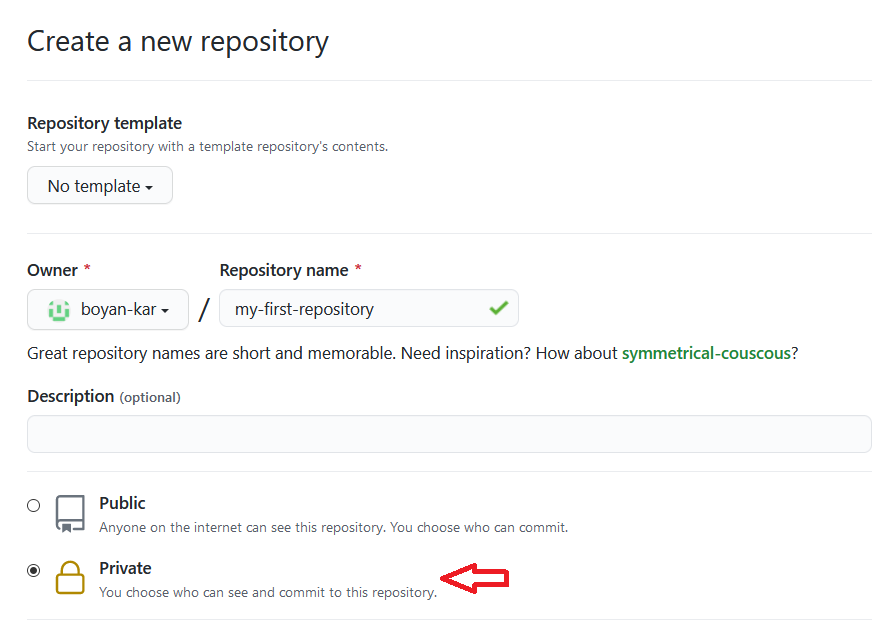
To make a repository, go to Repositories/New repository - choose a concise and informative name that has no spaces or funky characters in it. This can be your master repo that holds together past and ongoing research, data, scripts, manuscripts. Later on you might want to have more repositories - e.g. a repository associated with a particular project that you want to make public or a project where you are actively seeking feedback from a wider audience. For now, we will focus on organising and using your main repository that holds the files for all your work. With a free GitHub account, you can use public or private respositories.
Let’s create a new private repository. You can call it whatever you like if the name is available.
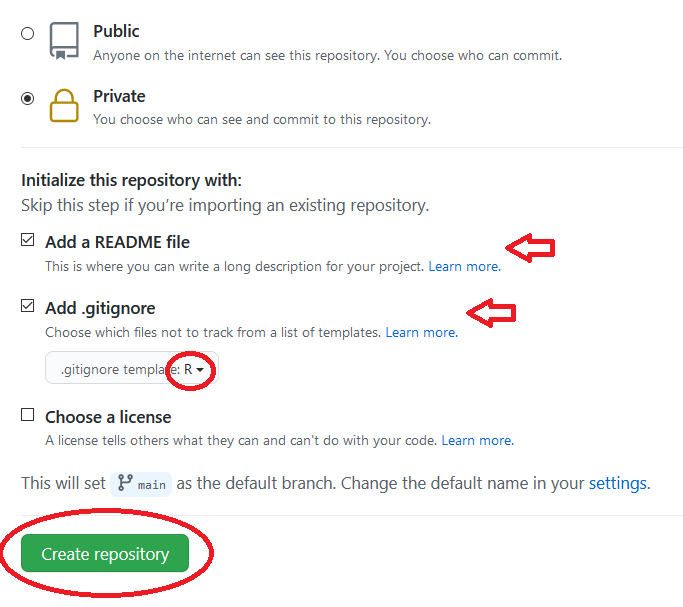
Click on Initialise repo with a README.md file. It’s common practice for each repository to have a README.md file, which contains information about the project, the purpose of the repository, as well as any comments on licensing and data sources. Github understands several text formats, including .txt and .md. .md stands for a file written in Markdown. You might have used Markdown before from within RStudio to create neatly organised reports of your code and its outputs (you can also check out our Markdown tutorial. You can also use Markdown to write plain text files, for example the file you are reading now was written in Markdown.
We will also create a .gitignore file. This file lets Git know what kind of files should not be included in the repository. We’ll have a look at that file in a bit. Tick the box, then search for R in the drop-down template (or whatever programming language you will be using for the project).
Once you are ready, click on Create repository.
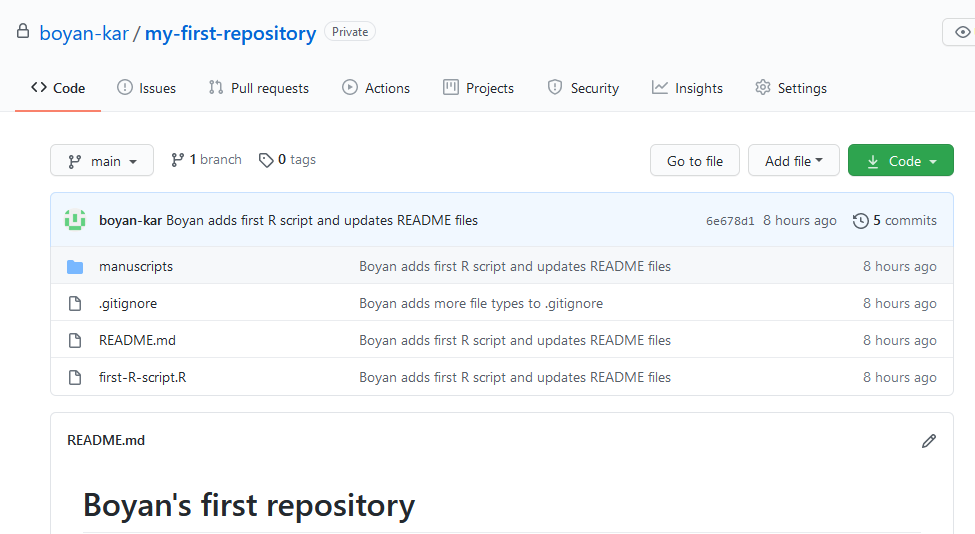
Here is how the repository should look:
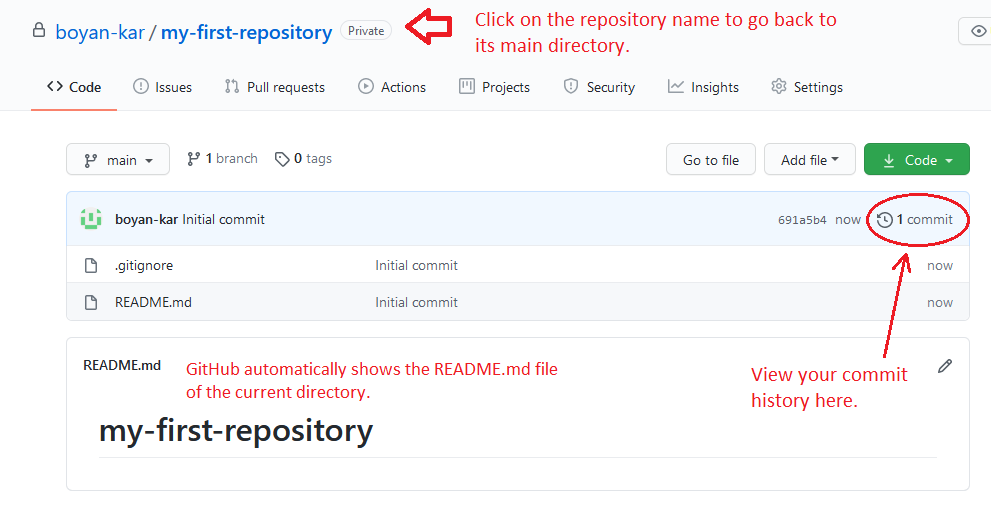
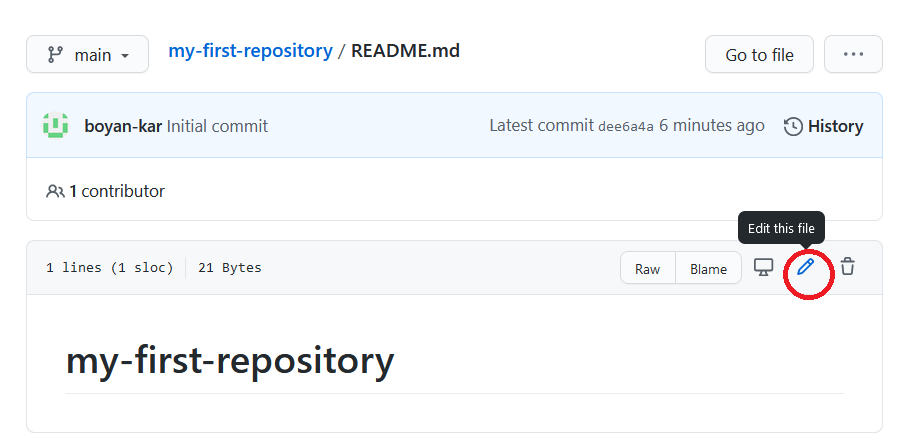
You can directly edit your README.md file on Github by clicking on the file and then selecting Edit this file.
Exercise 1: Write an informative README.md file
You can now write the README.md file for your repository. To make headings and subheadings, put hashtags before a line of text - the more hashtags, the smaller the heading will appear. You can make lists using - and numbers 1, 2, 3, etc.. When working on a shared project, discuss what you may want to include with your collaborators - here are some things you might want to consider:
- Your name

- Project title

- Links to website & social media

- Contact details
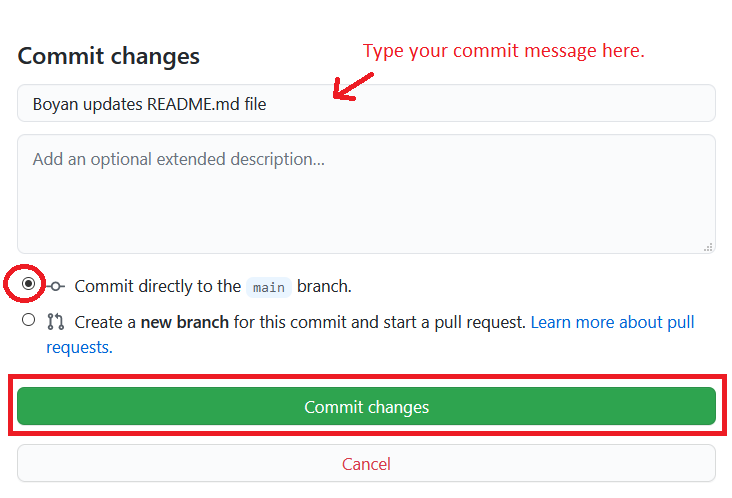
Once you have written your README.md file, scroll to the bottom of the page. You can now commit the file to the repository. To do so, specify a commit message which briefly describes the changes. Commit messages should concise, but descriptive. Select Commit directly to the main branch and then click on Commit changes.
Exercise 2: Edit the .gitignore file
Repositories often have a file called .gitignore and we are about to make one shortly. In this file you specify which files you want Git to ignore when users make changes and add files. Examples include temporary Word, Excel and Powerpoint files, .Rproj files, .Rhist files, etc. Some files you might want to only have on your local repository (i.e. on your computer), but not online as they might be too big to store online.
Select the .gitignore and click ‘Edit’. As you will see, the template GitHub provides for R already includes many file types usually found in R projects that should not be included in shared repositories. You can add more files by specifying each file type on a separate line. Scroll to the bottom of the document and paste the following additions, without overwriting the rest. Comments in the file are designated by a # sign. Then, commit the file to the main branch.
# Prevent users to commit their own .RProj
*.Rproj

# Temporary files
*~
~$*.doc*
~$*.xls*
*.xlk
~$*.ppt*

# Prevent mac users to commit .DS_Store files
*.DS_Store

# Prevent users to commit the README files created by RStudio
*README.html
*README_cache/
#*README_files/
Exercise 3: Create folders
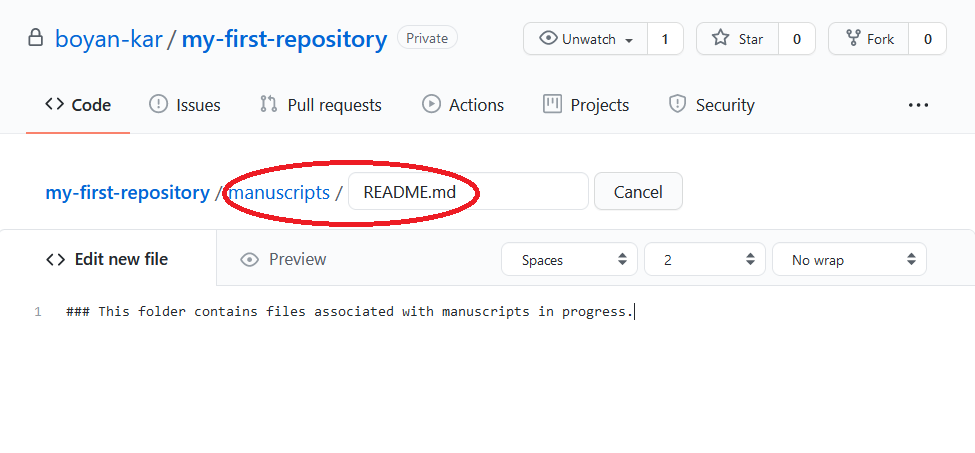
Think of different folders you may want to include in your repository. If working on a shared repo, discuss with your collaborators. For the repository for a lab group, some examples include: manuscripts, data, figures, scripts, scripts/users/personal_folder_your_name. To make a new folder, click on Create new file and add in the name of your new folder, e.g. manuscripts/ before the file name, in this case a quick README.md file. When creating folders within your repo through GitHub’s website, you always need to make at least one file associated with them, you can’t just create an empty folder. You can then write and commit the file.
GitHub etiquette
If you’ll be sharing the repository with collaborators and even for your own benefit, it’s a good idea to define some rules on how to use the repository before we start working within it - for example what GitHub and coding etiquette should people be following? Is there a prefered folder structure, file naming system?
We can make a new github-etiquette.md file that outlines the rules that people with access to your repository should follow.
Exercise 4: Write a github-etiquette.md file
Go to your lab’s main repository, click on Create new file and add github-etiquette.md as a file name. Remember to include the file extension .md - otherwise GitHub won’t know what’s the file format.
A few GitHub rules:
- Keep file paths short and sensible.
- Don’t use funky characters and spaces in your file names, these cause trouble because of differences in Mac/Windows systems.
- Always pull before you start working on your project and before you push in case someone has done any work since the last time you pulled - you wouldn’t want anyone’s work to get lost or to have to resolve many coding conflicts.
3. Sync and interact with your repository through RStudio
The “commit-pull-push” workflow can be embedded within RStudio using “Projects” and enabling version control for them - we will be doing that shortly in the tutorial.
Log into your Github account and navigate to the repository you created earlier
Click Code and copy the HTTPS link.

Now open RStudio, click File/ New Project/ Version control/ Git and paste the HTTPS link from the Github repository into the Repository URL: field. Select a folder on your computer - that is where the “local” copy of your repository will be (the online one being on Github).
Once you attempt the project, you will be asked to authenticate. You only need to do this once on your computer. There are multiple possible ways to authenticate your GitHub account on your computer and make it work with RStudio. Here are two recommended approaches:
Sign in via Personal Access Token (All platforms, recommended)
Create a Personal Access Token (All platforms)
Creating a Personal Access Token (PAT) is the recommended most secure method for all platforms. However, if you are using Windows (as of September 2021) you may be able to authenticate using the quick “Sign in via browser” option. If you wish to do so, follow the instructions under the next button (Sign in via internet browser (Windows only)).
You can create a PAT using the GitHub website and specify the exact permissions that it provides your computer when interacting with GitHub in the cloud. We will create a token that allows for access and modifications to the repository.
Step 1: Create PAT at GitHub website
- In the GitHub website, click on your profile picture in the top-right corner and go to Settings.
- In the left sidebar, go to Developer settings. Then, again in the left sidebar, click Personal access tokens.
- Click Generate new token. Give the token a name (something that describes what you will use it for, e.g. “Local machine token”).
- Select an Expiration time. You can set to no expiration so that you will not have to re-authenticate.
- Then, select the permissions you grant to this token. Simply select the “repo” group in bold.
- Click Generate token. Make sure to copy the token and store it securely, since the website will not show it to you again. (If something goes wrong, you can always generate a new one.)
You can also follow this guide with screenshots: https://docs.github.com/en/authentication/keeping-your-account-and-data-secure/creating-a-personal-access-token
Step 2: Authenticate (within RStudio)
On Windows, once you interact with a private repository you should get a prompt looking like this:
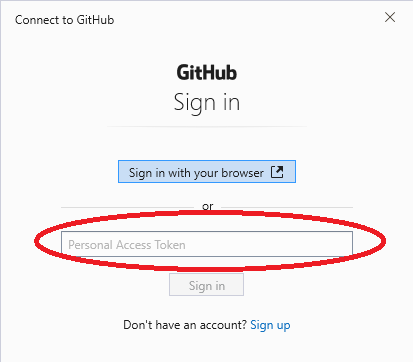
Simply paste the token into the Personal access token field and continue.
On Linux/macOS, you should get a prompt for your username and then for your password. Input your GitHub username, and under password, input your PAT instead.
Your authentication should now be successful and you can interact with GitHub repositories directly from RStudio.
Sign in via internet browser (Windows, fast)
Sign in via internet browser
On Windows, once you try to clone a private repository from GitHub, you should get a prompt like this:
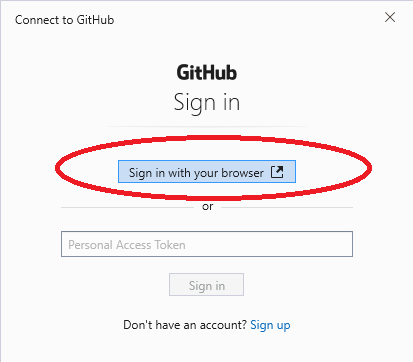
Simply click “Sign in via browser” and authorise your device in the browser window that pops up. Authentication may happen automatically if already logged into GitHub in your browser.
If you do not get a window like this, but simply a request to input your username, follow the instructions for Personal Access Token above.
Troubleshooting (GitHub in RStudio)
Do you have troubles with authenticating with GitHub? Follow this guide to remove GitHub authentication from your computer and sign in anew.
Important: This is relevant if you used GitHub in an RStudio project before August 13, 2021 and it has since stopped working. This has likely occurred due to changes implemented by GitHub on that date to make authentication more secure. Here is how to fix this issue, by removing GitHub authentication credentials from your computer and logging in again. These instructions may be helpful for other GitHub authentication issues as well.
Step 1 (all platforms):
In your R session in RStudio, execute the following lines:
install.packages('gitcreds')
library(gitcreds)
gitcreds_delete()
Do not worry if you receive a warning or error and proceed to the next step. Close RStudio (important!).
Step 2:
Windows
In the Start Menu, search for and open Credential Manager. Click on Windows Credentials. For all listed items that include ‘github’, click on the arrow and then click Remove. Close the window.
Linux
In the terminal, execute:
git config --global --unset credential.helper
rm $HOME/.git-credentials
macOS
In the terminal, paste the following and press Return:
git credential-osxkeychain erase
host=github.com
protocol=https
Do not worry if you do not find the credentials (under Windows) or the commands produce an error. Proceed to Step 3.
Step 3: Open your project within RStudio again and attempt to interact with the GitHub repository (e.g. Pull any changes). You should see a prompt to authenticate. Follow the instructions under the buttons above (Personal Access Token or Login via Browser).
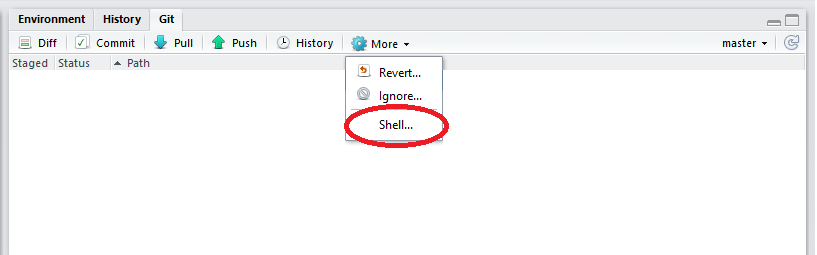
Before your first commit from your computer, you will need to configure your username and email. This is easily done, and you only need to do it once, afterwards you can commit-pull-push at your convenience!
In the top right corner of the RStudio screen (in the Git tab), click on More/Shell.
NOTE: If using a Windows PC, the Shell option should launch Git Bash. If it doesn’t open Git Bash, please find Git Bash on your computer instead. You can usually search for it in the Start menu, or right-click on the empty space in any folder in the File Explorer and click “Git Bash Here”.
Copy the following code:
git config --global user.email your_email@example.com
# Add the email with which you registered on GitHub and click Enter

git config --global user.name "Your GitHub Username"
# Add your GitHub username and click Enter
If it worked fine, there will be no messages, you can close the shell window and do your commit again, this time it will work!
Hiccups?
We know that there might be problems with the newest updates of the Mac software and installing git and linking it with RStudio. The solutions appear to be very specific to the Mac version you have, so if the above steps didn’t work, a good starting point is googling "rstudio can’t find git mac your version" and trying out the suggested solutions.
Once the files have finished copying across (this may take a while depending on the size of the repo you’re joining), you will notice that a few things about your RStudio session have changed: there is a Git tab in the top right corner of RStudio, and all the files that are in the repo are now on your computer as well.
You are now ready to start making changes and documenting them through Github! Note that you can’t push empty folders.
You can open some of the files you made online earlier - for example if you click on your README.md file, it will open in RStudio and you can make changes. Add some more text just for the sake of exemplifying how version control works. Save the file in the same location (i.e., your repository).
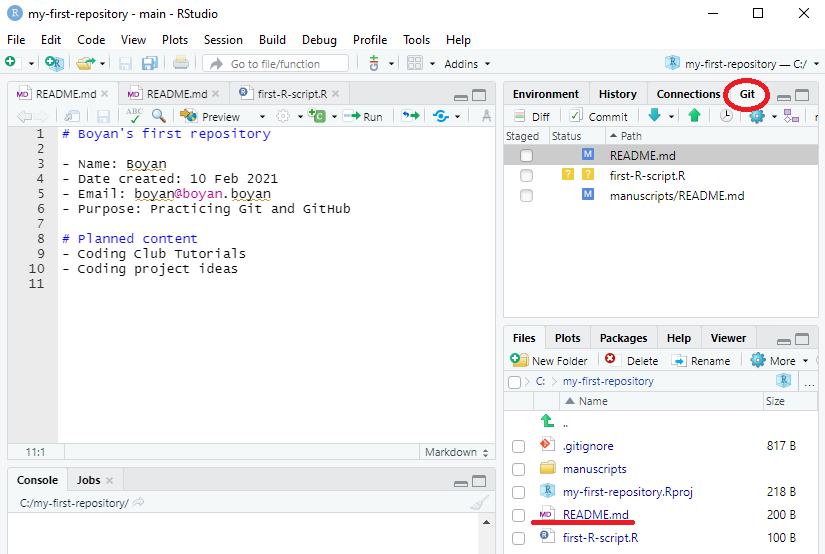
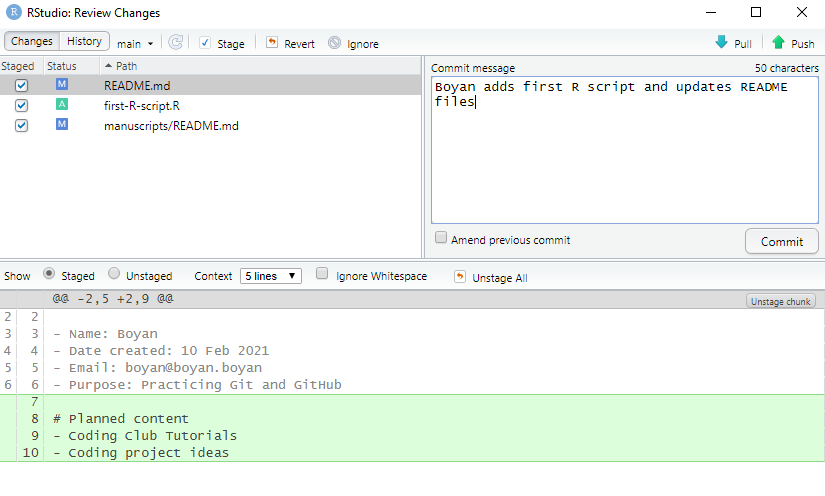
If you click on the Git tab you will see that now your README.md file is listed there. Add a tick next to it. Now it has an M - this means you have modified the file. If there’s an A, that’s an added file, and a D is a deleted file.
If you select the README.md file and click on Diff, you will see the changes you have made. Once the file is selected, it is staged, ready to be commited to Github.
Click on Commit and add in your commit message - aim to be concise and informative - what did you do? Once you have clicked on Commit, you will get a message about what changes you have made.
You will see a message saying that your branch is now one commit ahead of the origin/main branch - that is the branch that is on Github - we now need to let Github know about the changes we have made.

We can’t repeat it enough: always Pull before you Push. Pull means that you are retrieving the most recent version of the Github repository onto your local branch - this command is especially useful if several people are working within the same repository - imagine there was a second script examining soil pH along this elevation gradient, and your collaborator was working on it the same time as you - you wouldn’t want to “overwrite” their work and cause trouble. In this case, you are the only one working on these files, but it’s still good to develop the practice of pulling before you push. Once you’ve pulled, you’ll see a message that you are already up to date, you can now push! Click on Push, wait for the loading to be over and then click on Close - that was it, you have successfully pushed your work to Github!
Go back to your repository on Github, where you can now see all of your updated files online.
Click on your script file and then on History - this is where you can see the different versions of your script - obviously in real life situations you will make many changes as your work progresses - here we just have two. Thanks to Github and version control, you don’t need to save hundreds of almost identical files (e.g. Dissertation_script_25thFeb.R, Dissertation_script_26thFeb.R) - you have one file and by clicking on the different commits, you can see what it looked like at different points in time.
You are now ready to add your scripts, plots, data files, etc. to your new project directory and follow the same workflow as outlined above - stage your files, commit, pull, push.
Potential problems
Sometimes you will see error messages as you try to commit-pull-push. Usually the error message identifies the problem and which file it’s associated with, if the message is more obscure, googling it is a good step towards solving the problem. Here are some potential problems that might arise:
Code conflicts
While you were working on a certain part of a script, someone else was working on it, too. When you go through commit-pull-push, GitHub will make you decide which version you want to keep. This is called a code conflict, and you can’t proceed until you’ve resolved it. You will see arrows looking like >>>>>>>>> around the two versions of the code - delete the version of the code you don’t want to keep, as well as the arrows, and your conflict should disappear.
Pushing the wrong files
If you accidentally push what you didn’t intend to, deleted many things (or everything!) and then pushed empty folders, you can revert your commit. You can keep reverting until you reach the point in time when everything was okay. This is an easy way out if you’re the only person working in the repository - be aware that if there are other people that have committed to the repository, reverting will also undo all of their work, as reverting refers to the repository as a whole, not just your own work in it.
Using these “undo” commands can be daunting, so make sure you read up on the different commands before you attempt anything that may delete work permanently: here’s a starter. It’s a good idea to regularly back up your repository to an external hard drive juuuust in case!
Verified commits
When you browse your commit history through the GitHub website, you may notice that commits made through the website are listed as “Verified”, while commits pushed from your computer are not. This is generally not a big deal, but in large collaborative projects you may want to verify your locally made commits - here is a guide how.
4. Sync and interact with your repository through the command line
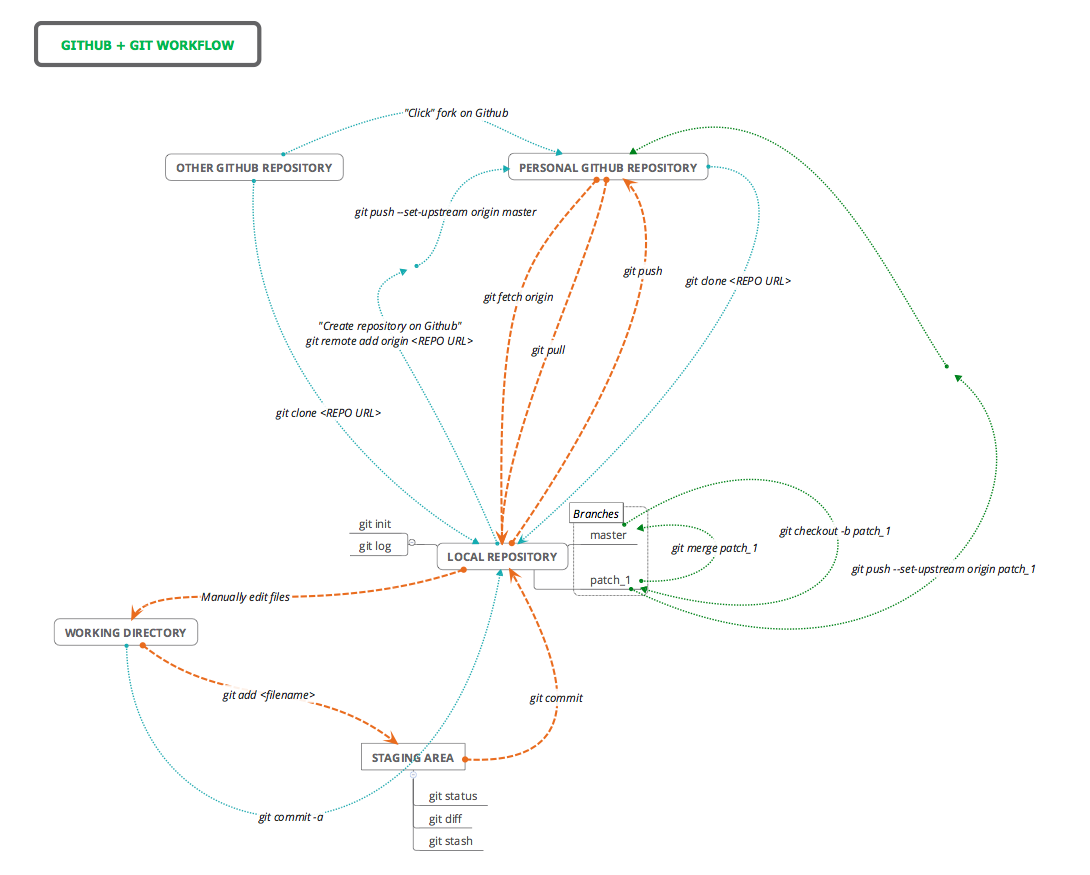
Traditionally, Git uses the command line to perform actions on local Git repositories. In this tutorial we ignored the command line but it is necessary if you want more control over Git. There are several excellent introductory guides on version control using Git, e.g. Prof Simon Mudd’s Numeracy, Modelling and Data management guide, The Software Carpentry guide, and this guide from the British Ecological Society Version Control workshop. For more generic command line tools, look at this general cheat sheet and this cheat sheet for mac users. We have also created a table and flow diagram with some basic Git commands and how they fit into the Git/Github workflow. Orange lines refer to the core workflow, the blue lines describe extra functions and the green lines deal with branches:
| Command | Origin | Destination | Description |
|---|---|---|---|
git clone REPO_URL |
Personal Github | Local | Creates a local copy of a Github repo. The URL can be copied from Github.com by clicking the `Clone or Download` button. |
git add README.md |
Working Dir | Staging Area | Add "README.md" to staging area. |
git commit |
Staging Area | Local | Commits changes to files to the local repo. |
git commit -a |
Working Dir | Local | adds and commits all file changes to the local repo. |
git pull |
Personal Github | Local | Retrieve any changes from a Github repo. |
git push |
Local | Personal Github | Sends commited file changes to Github repo. |
git merge |
Other branch | Current branch | Merge any changes in the named branch with the current branch. |
git checkout -b patch1 |
NA | NA | Create a branch called "patch1" from the current branch and switch to it. |
git init |
NA | NA | Initialise a directory as a Git repo. |
git log |
NA | NA | Display the commit history for the current repo |
git status |
NA | NA | See which files are staged/unstaged/changed |
git diff |
NA | NA | See the difference between staged uncomitted changes and the most recent commit |
git stash |
NA | NA | Save uncommitted changes in a temporary version and revert to the most recent commit |
Below is a quick exercise so you can familiarise yourself with these command line tools. There are a few ways to use interact with Git using the terminal:
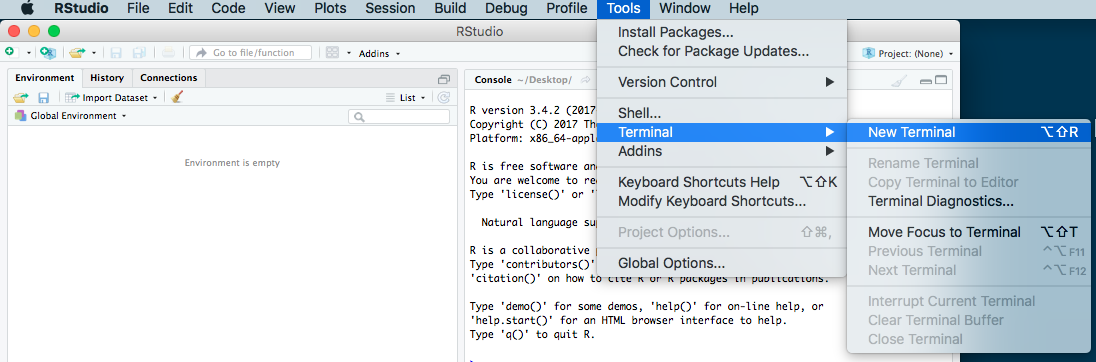
- If you are already in RStudio on a Mac or Linux machine, you can open a terminal within RStudio by going to
Tools -> Terminal -> New Terminalin the menu. - If you are on a Mac or Linux machine you could just open a terminal program and run Git from there. Most Mac and Linux machines will have Git installed by default. On Mac you can go open a terminal by going to:
Applications/Utilities/Terminal.app. - If you are on a personal Windows machine, you can run Git using Git Bash, which can be installed when you installed Git. You should be able to launch it from More -> Shell in RStudio. If that doesn’t work, look up the programme under your Start Menu.
Once you have opened a terminal using one of the above methods, start by creating a folder somewhere on your local system called git_test, using the mkdir (make directory) command by typing the following into the terminal and hitting “Enter”. For example, to create the directory in the Documents folder:
mkdir ~/Documents/git_test
Then enter that folder using cd (change directory):
cd ~/Documents/git_test
To make the folder into a Git repository:
git init
Now the folder has been made into a Git repository, allowing you to track changes to files. Now, lets create a README.md file inside the repository and put some text in it, using whatever text editor you are comfortable with. Make sure to place this README.md file into the repository folder on your device so it can be found!
You can create empty text files via a single command in the shell:
touch README.md
touch .gitignore
touch test.R
Now, to add a file to be tracked by the Git repository:
git add README.md
To check what files have been staged and unstaged changes:
git status
The README.md file has now been added to the staging area, but has not yet been committed to a version of the repository. To commit a version:
git commit -m "Your commit message here"
Currently, the Git repository is still only on our local computer. Versions are being committed, but they are not being backed up to a remote version of the repository on Github. Go to Github and create a repository called git_test, like you did earlier on in the workshop, but this time don’t create a README.md because we have just made one on the local computer. Now, copy the HTTPS link for that repository. In the terminal, link the local Git repository with the remote repository using the following code, replacing <HTTPS_LINK> with the link you copied:
git remote add origin <HTTPS_LINK>
Then make the first push to that newly linked remote repository:
git push -u origin main
Now you can continue editing files, adding changes (git add <FILE>), committing changes (git commit), pulling (git pull) and pushing (git push) changes, similar to the process you did with clicking buttons in RStudio. Feel free to explore some of the more advanced commands laid out in the table and flow diagram above. You can also check out a more advanced command line tutorial written by Prof Simon Mudd for Numeracy, Modelling and Data management guide.
This tutorial was developed as part of the collaboration between Coding Club and the NERC E3 Doctoral Training Programme. To learn more about the E3 DTP, check out the programme’s website.