Tutorial Content
- Introduction: What is an R package?
- Packages that need to be installed
- The most basic R package
- Making a new R project
- Adding documentation (help files)
- Uploading to and installing from GitHub
- Other useful things to know
- Additional resources
This tutorial was originally created by the University of Stirling’s Coding Club, and can be found at this link. Our Coding Club would like to extend our deepest gratitude to them, for allowing us to publish this tutorial on our website as well. After going through this tutorial, you will be able to write a basic R package, which can be installed from Github.
1. Introduction: What is an R package?
Packages are bundles of code and data that can be written by anyone in the R community. R Packages can serve any number of uses, and range from well documented and widely used statistical libraries to packages of functions that tell knock-knock jokes.
If you have been using R for even a short length of time, you have probably needed to install and use the functions published in an R package. In these notes, I will walk you through the basics of writing your own R package. Even if you never intend to do this for your own code, I hope that this process will make you more familiar with the R packages that you use in your research, and how those packages are made.
A lot of R users are probably familiar with the Comprehensive R Archive Network (CRAN), a massive repository that currently holds over 13000 published R packages. Packages on CRAN are published for the R community and installed in RStudio using the function install.packages. But not every R package is or should be uploaded to CRAN. Packages can uploaded and downloaded from GitHub, or even just built for personal use (some R users have their own personal R packages with documented functions that they have written and regularly use in their own research).
Here I will walk through the process of writing a very simple R package, uploading it to GitHub, and downloading it from GitHub. Throughout these notes, I will present only the Rstudio version of package development, but package development can also be done using the command line (though there is really no reason to do this, as Rstudio makes the whole process much easier). There are some packages that need to be installed before we start developing.
2. Packages that need to be installed
Before getting started, we need to install the devtools and roxygen2 packages. The former contains a large bundle of tools needed in package development, while the latter is used to easily write documentation.
install.packages("devtools")
install.packages("roxygen2")
It might be necessary to restart Rstudio after installing the above packages.
3. The most basic R package
Assume that we want to create an R package that includes two functions. The first function will convert temperatures from degrees Fahrenheit to degrees Celsius, while the second function will convert temperatures from degrees Celsius to degrees Fahrenheit. The first thing we need to do is create a new folder somewhere on our computer that will hold the whole R package (there are other ways of doing this, but I am showing the way that I tend to use most often).
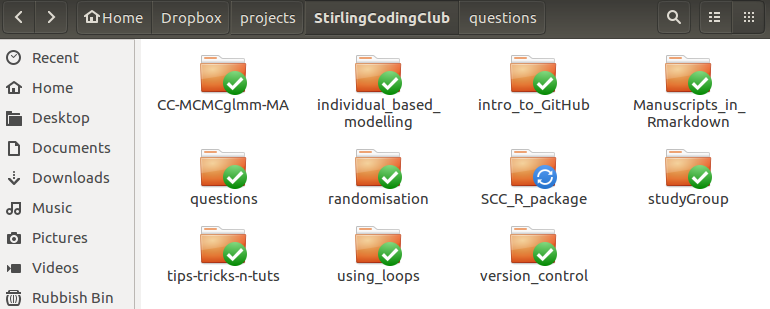
The above shows the new folder ‘SCC_R_package’. For now, this folder is empty. The first thing that we need to do is to create a new folder inside of ‘SCC_R_package’ called ‘R’.

Inside this folder is where we will store the actual R scripts with the coded functions. Any number of ‘.R’ files can be included in the folder, and each file can have any number of functions. You could, for example, give each function its own file, or just have one file with many R functions. For large projects, I find it easiest to group similar functions in the same R file. In our new R package, I will write both functions in the same file called ‘temp_conversion.R’, which has the code below.
F_to_C <- function(F_temp){
    C_temp <- (F_temp - 32) * 5/9;
    return(C_temp);
}

C_to_F <- function(C_temp){
    F_temp <- (C_temp * 9/5) + 32;
    return(F_temp);
}
That is the whole file for now; just nine lines of code.

The next thing that we need to do is create a new file called DESCRIPTION in the SCC_R_package directory (note, not in ‘R’, but just outside of it). This will be a plain text file with no extension, and it will hold some of the meta-data on the R package. For now, the whole file is just the following four lines of code, specifying the package name, type, title, and version number.
Package: SCCTempConverter
Type: Package
Title: Temperature Conversion Package for Demonstration
Version: 0.0.1.0
If we really wanted to call it quits, this is technically an R package, albeit an extremely basic one. We could load it using the code above after first reading in the devtools library.
library(devtools);
load_all("."); # Working directory should be in the package SCC_R_package
Note that the working directory needs to be set correctly to the R package directory (e.g., using the setwd function, or by choosing Session > Set Working Directory from the pull down menu of RStudio). In doing this, the above functions F_to_C and C_to_F are now read into R and we can use them to convert temperatures.
F_to_C(79);
C_to_F(20);
This is not a good stopping point for writing a package though, because we really should include some sort of documentation explaining what the package is for and helping users know what functions do.
4. Making a new R project
To get started on a proper R package complete with documentation, the best thing to do is to create a new R project. To do this in Rstudio, go to File > New Project...; the box below should pop up.
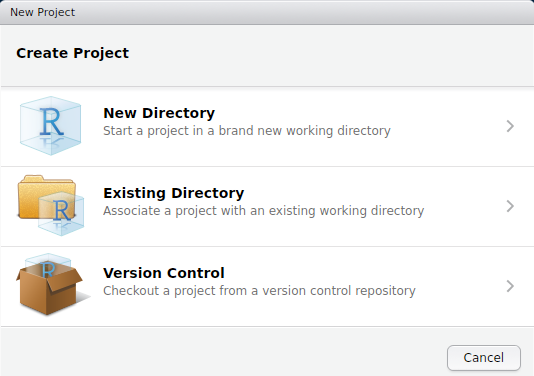
Note that we could have started with a project right away, creating a new folder with the New Directory option. Instead, we will create the project in our Existing Directory, SCC_R_package by choosing the middle option. The following box should appear.
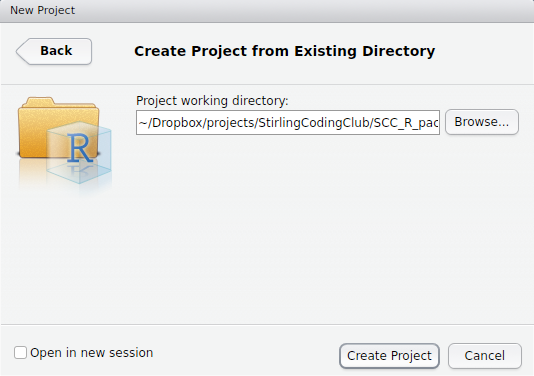
The box above is asking for the local directory in which the project will be stored. Mine is shown above, but yours will be different depending on where SCC_R_package is stored. After clicking ‘Create Project’, you should be able to see the project inside the package directory.

The R project is shown above as SCC_R_package.Rproj. Note that there are a couple other new things in the directory above, including .Rproj.user and .Rbuildignore. These are hidden files, so you might not see these in your own directory unless you explicitly ask your computer to show hidden files. The folder .Rproj.user is not really important; it stores some more meta-data about the package development. The file .Rbuildignore is not important for now, but could be useful later; this is just a plain text file that tells R to ignore selected files or folders when building the package (e.g., if we wanted to include a folder for our own purposes that is not needed or wanted for building the package). The interface in RStudio should now look something like the below.

The colours you use might vary, but you should see the ‘SCC_R_package’ in the upper right indicating the project name.
5. Adding documentation (help files)
If we want others to use the functions that we have written, we need to provide some documentation for them. Documentation shows up in the ‘Help’ tab of RStudio when running the function help. You can run the following code to see what I mean.
help(lm);
Note that the code below does the same thing as the code above.
?lm
You should see a tab pop up somewhere in Rstudio that reads a markdown file with a helpful explanation of the lm function in R.
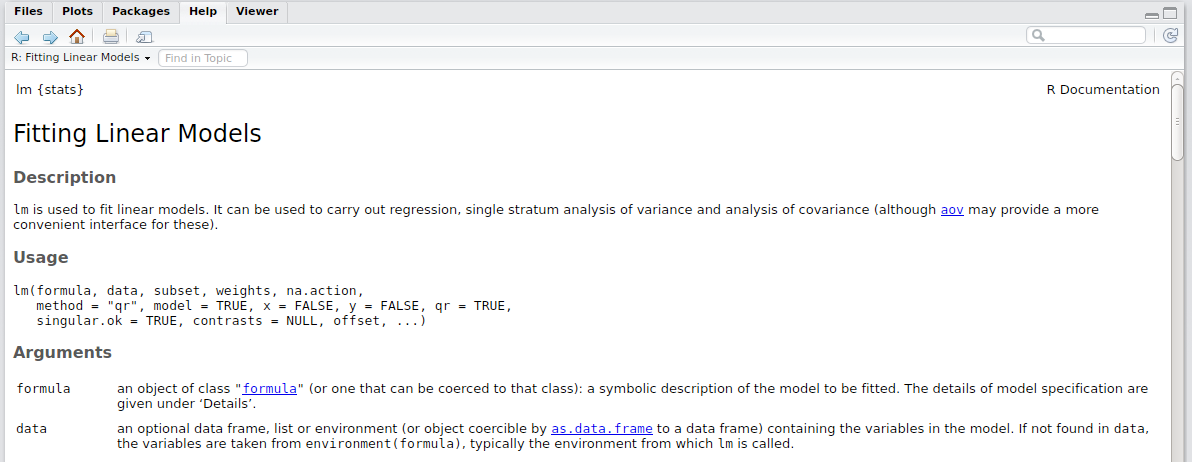
You can make one of these helpful markdown files in Rstudio using the roxygen2 package. To do this, we need to add to the functions written in the temp_conversion.R file. The code below shows a simple example.
#' Fahrenheit conversion
#'
#' Convert degrees Fahrenheit temperatures to degrees Celsius
#' @param F_temp The temperature in degrees Fahrenheit
#' @return The temperature in degrees Celsius
#' @examples
#' temp1 <- F_to_C(50);
#' temp2 <- F_to_C( c(50, 63, 23) );
#' @export
F_to_C <- function(F_temp){
    C_temp <- (F_temp - 32) * 5/9;
    return(C_temp);
}

#' Celsius conversion
#'
#' Convert degrees Celsius temperatures to degrees Fahrenheit
#' @param C_temp The temperature in degrees Celsius
#' @return The temperature in degrees Fahrenheit
#' @examples
#' temp1 <- C_to_F(22);
#' temp2 <- C_to_F( c(-2, 12, 23) );
#' @export
C_to_F <- function(C_temp){
    F_temp <- (C_temp * 9/5) + 32;
    return(F_temp);
}
Note that the total length of the code has increased considerably to add in the documentation, but we now have some helpful reminders of how to use each function. The first line (e.g., #' Fahrenheit conversion) shows the function title, with the next line showing the description. Additional tags such as @param and @examples are used to write different subsections of the help file. These are not the only tags available; for more details about the Roxygen format, see [Karl Broman’s page](http://kbroman.org/pkg_primer/pages/docs.html or Hadley Wickham’s introduction to roxygen2. Using the above format, the roxygen2 package makes it easy to create help files in markdown. All that we need to do is make sure that the project is open and that the working directory is correct (typing getwd() should return the directory of our R package), then run the below in the console.
library(roxygen2); # Read in the roxygen2 R package
roxygenise();      # Builds the help files
Here is what our package directory looks like now.
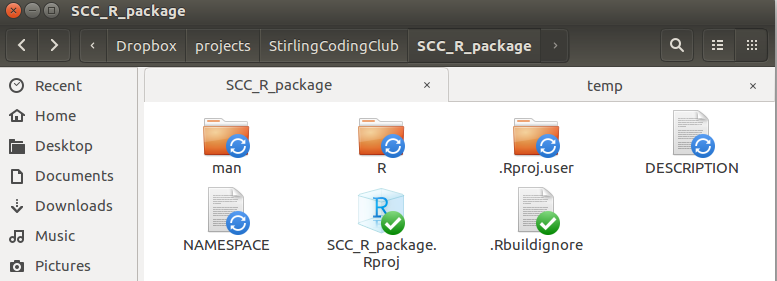
Note that two things have been added. The first is a new directory called ‘man’, which holds the help files that we have written. The second is a plain text file NAMESPACE, which works with R to integrate them into the package correctly; you do not need to edit NAMESPACE manually, in fact, the file itself tells you not to edit it. Here are the entire contents of NAMESPACE.
# Generated by roxygen2: do not edit by hand

export(C_to_F)
export(F_to_C)
Inside the ‘man’ folder, there are two new markdown documents, one for each function.

Both are plain text files. Here are the contents of F_to_C.Rd.
% Generated by roxygen2: do not edit by hand
% Please edit documentation in R/temp_conversion.R
\name{F_to_C}
\alias{F_to_C}
\title{Fahrenheit conversion}
\usage{
F_to_C(F_temp)
}
\arguments{
\item{F_temp}{The temperature in degrees Fahrenheit}
}
\value{
The temperature in degrees Celsius
}
\description{
Convert degrees Fahrenheit temperatures to degrees Celsius
}
\examples{
temp1 <- F_to_C(50);
temp2 <- F_to_C( c(50, 63, 23) );
}
We can load the package now and ask for help with F_to_C.
?F_to_C;
RStudio will present the below in the ‘Help’ tab.
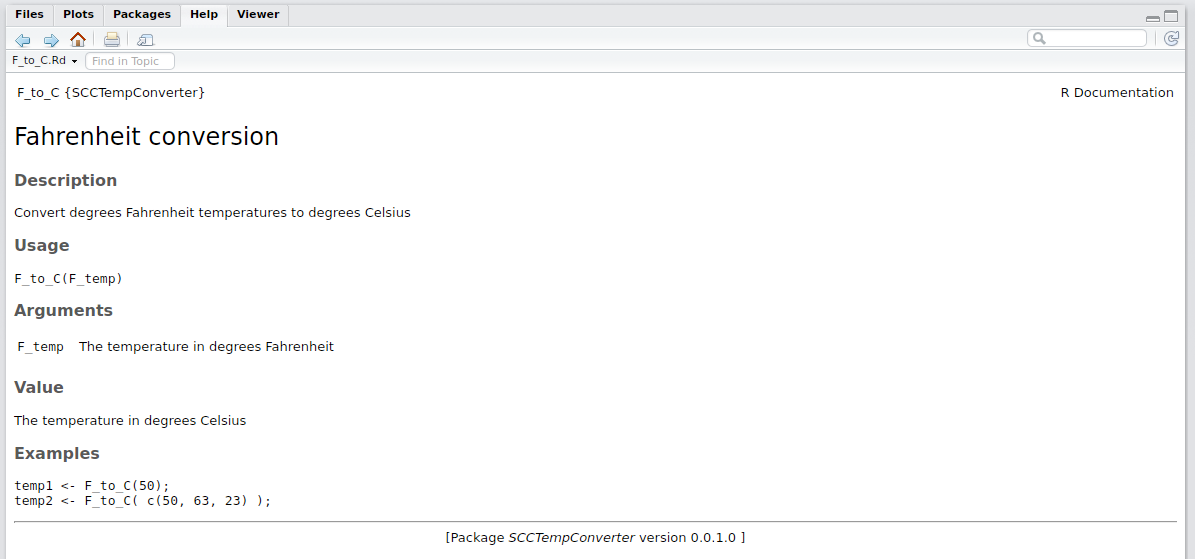
Now that we have the key functions and documentation, we can upload this to GitHub for the world to see and use.
6. Uploading to and installing from GitHub
Note that putting the R package on GitHub is not a requirement, but it is probably the easiest way to share your work. Before uploading the R package to GitHub, I will add one more folder to the repository.

I use the arbitrarily named ‘notebook’ folder to hold various files that I want to be available to me in development, but not actually present in the R package. I can make the R package ignore this in build by adding a single line of code to the ‘.Rbuildignore’ file mentioned earlier. Below are the entire contents of the ‘.Rbuildignore’ file.
^.*\.Rproj$
^\.Rproj\.user$
notebook*
The lines ^.*\.Rproj$ and ^\.Rproj\.user$ were already added automatically by RStudio. My added line notebook* tells R to ignore anything that follows ‘notebook’ in the directory. This would include anything in the folder ‘notebook’ (e.g., ‘notebook/file1.txt’), but also any folder or file that starts out with these characters (e.g., ‘notebook2/file1.txt’ or ‘notebook_stuff.txt’). I will now add these notes and all the images I have used to this folder.

With the notebook folder now added, I need to initialise a new GitHub repository (see version control notes for help). After doing this for Stirling Coding Club’s organisation, here is what it looks like on GitHub.
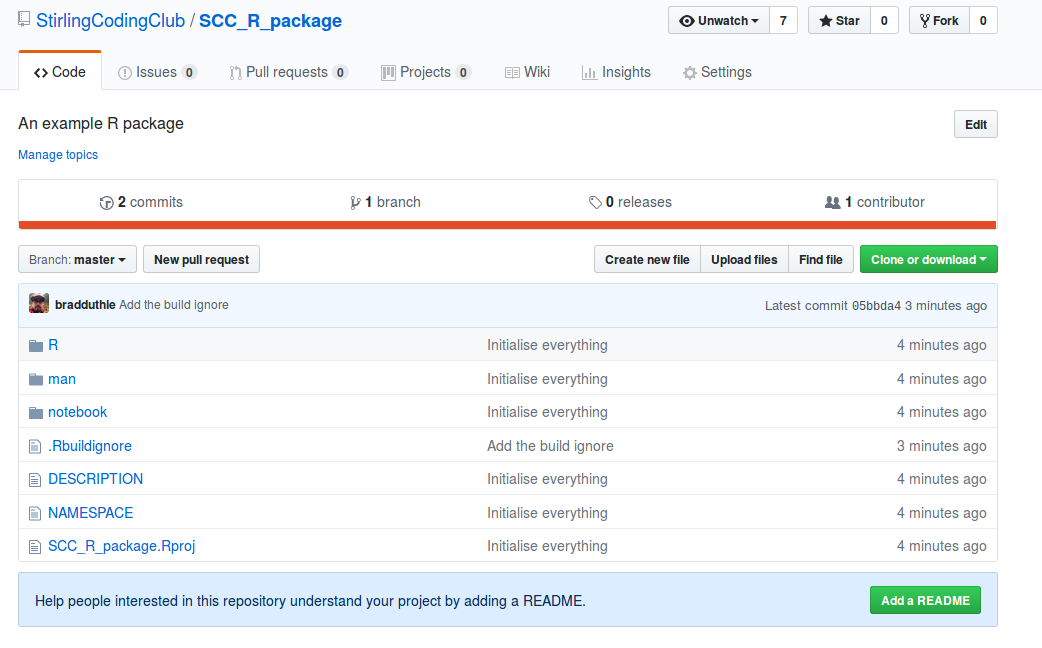
The R package is now live. Anyone can download it by using the install_github function in the devtools package. To do so, type the below into the RStudio console.
library(devtools) # Make sure that the devtools library is loaded
install_github("StirlingCodingClub/SCC_R_package");
Our R package is now installed. We can start using it by reading it in as a normal package.
library(SCCTempConverter);
F_to_C(30);
That is it! We can share the location of the R package with colleagues who we think might make use of its R functions. If you want to you can stop here, but I will press on with a few more helpful tips and tricks in the next section.
7. Other useful things to know
Additional subdirectories
The subdirectories (i.e., folders) that I have walked you through are not the only ones that are useful to include in an R package. Here, for example, is what the directory of the GMSE R package looks like.
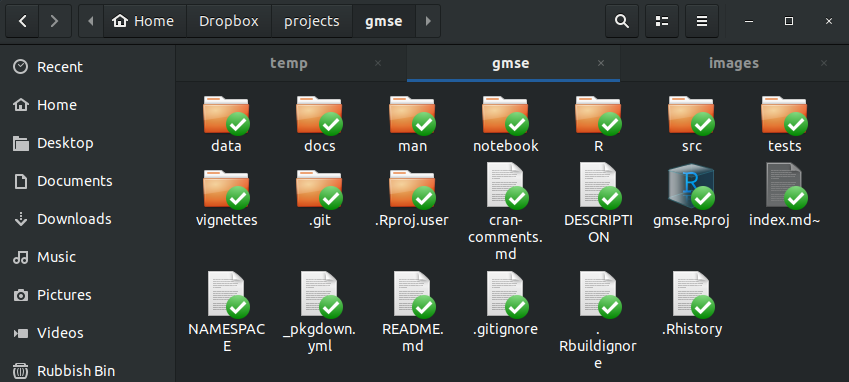
There is a lot of extra stuff here, but the following are what each folder contains:
-
data contains any and all data files provided in the R package. These files are saved in the
.rdaformat (e.g., usingsave()in R), and can be loaded usingdatawhen a package is read into R (e.g.,data(cars)in base R). -
docs includes documents for the GMSE website, which was produced in less than 20 minutes using the extremely helpful pkgdown R package (I highly recommend this for building website for your R package).
-
src contains compiled code that is used by your R functions. This could include code written in C or C++ to speed up computations. In some packages, most of the code is actually in this folder.
-
tests includes files to test your code to ensure that it is running properly throughout the development process. This folder can be created using the testthat R package. For large projects, especially, this is extremely useful because it allows you to quickly test to make sure that all of the functions that you write return the output that you expect of them.
-
vignettes includes larger documentation files for your code – more like a package guide than a simple help file for package functions. Here is an example from GMSE.
One more folder that could be useful but is not in the GMSE R package above is the following:
- inst allows you to add arbitrary files to the R install. This acts as a sort of reverse ‘.Rbuildignore’, in that it tells R to incorporate something specific into the R build process.
Building a source package
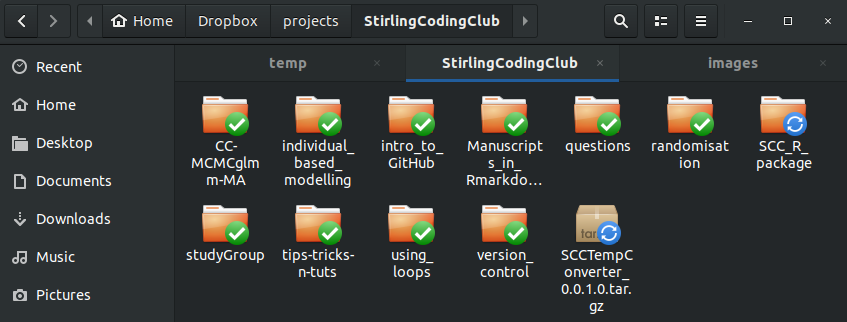
We can build a source package (i.e., a zipped version of the R package) in Rstudio by selecting Build > Build Source Package. This will create a zipped package outside of the package directory, which would be what we would need to build if we wanted to submit our package to CRAN.
Tagging a version
It is sometimes helpful to ‘tag’ a particular commit in git to identify a particular version or ‘release’ of your R package (e.g., in GMSE). I did not go into detail about using git tags in the version control session, but the general idea is that a tag is essentially a commit that has a meaningful name rather than a large number – the tag is therefore a snapshot of a particular point in the history of the repository that is of particular interest. In the command line, a commit works as below.
git tag -a v0.0.1.0 -m "my first version of SCC_R_package"
git push -u origin v0.0.1.0
Note that the BASH code above would create the tag ‘v0.0.1.0’ with the quoted message in the first line. In the second line, it would push the tag to GitHub. We can do the same thing in GitKraken with a more friendly graphical user interface.

To tag any commit, right click on the commit and select ‘Create tag here’. This allows you to name the commit, and the name will show up on the left hand side in GitKraken.

See the ‘SCCTempConverter.v0.0.1.0’ tag on the left. To push this tag to GitHub, right click on this tag and select ‘Push SCCTempConverter.v0.0.1.0 to origin’. We can now see that there is one release in the GitHub repository.
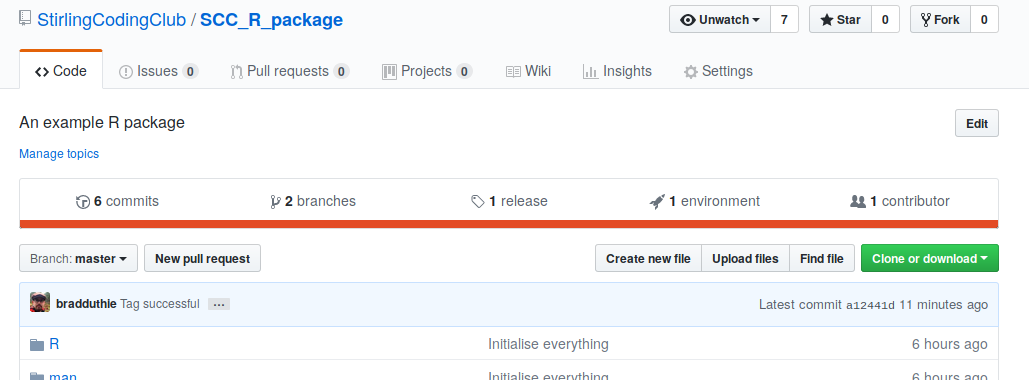
If we click on this, we would see the version we tagged.
8. Additional resources
From Karl Broman
From RStudio
