Tutorial Aims:
- Set up a lab GitHub organisational account
- Organise your lab repository
- Develop a coding & GitHub etiquette
- Learn to use RStudio and Github together
- Use Git on the command line
1. What is version control?
Version control allows you to keep track of your work and helps you to easily explore what changes you have made, be it data, coding scripts, or manuscripts. You are probably already doing some type of version control, if you save multiple files, such as Dissertation_script_25thFeb.R, Dissertation_script_26thFeb.R, etc. This approach will leave you with tens, if not hundreds, of similar files, it makes it rather cumbersome to directly compare different versions, and is not easy to share among collaborators. What if by the time your supervisor/co-author has finished commenting on Dissertation_script_26thFeb.R, you are already on Dissertation_script_27thFeb.R? With version control software such as Git, version control is much smoother and easier to implement. Using an online platform like Github to store your files also means that you have an online back up of your work, so you won’t need to panic when your laptop dies or your files mysteriously disappear.
You can use git through the command line, or through RStudio and/or GitHub desktop. You can check out our Intro to Github tutorial if you want to get a bit more practice with Github, but you don’t need to have completed the first tutorial to tackle this one. We encourage you to look through the extra resources we have added at the end of the tutorial if you are keen to use the command line for your version control. But until then, here we will be syncing RStudio and Github, so you can start using version control in minutes.
What are the benefits of using GitHub as a lab?
Having a GitHub repo for your lab makes it easy to keep track of collaborative and personal projects - all files necessary for certain analyses can be held together and people can add in their code, graphs, etc. as the projects develop. Each file on GitHub has a history, making it easy to explore the changes that occurred to it at different time points. You can review other people’s code, add comments on certain lines or the overall document, and suggest changes. For collaborative projects, GitHub allows you to assign tasks to different users, making it clear who is responsible for which part of the analysis. You can also ask certain users to review your code. Overall, GitHub presents a great opportunity to have an online back up copy of your work, whilst also doing version control, and it can also make it easier to discuss code, as well as write and edit code collaboratively.
How does GitHub work?
The members of the organisational’s account repository each have a local copy (i.e. on their computer) of all the files in the repository. The GitHub workflow can be summaried by commit-pull-push.
- Commit
- Once you’ve saved your files, you need to commit them - this means they are ready to go up on GitHub (the online copy of the repository).
- Pull
- Now you need to pull, i.e. make sure you are completely up to date with the online version of the files - other people could have been working on them even if you haven’t.
- Push
- Once you are up to date, you can push your changes - at this point in time your local copy and the online copy of the files will be the same.
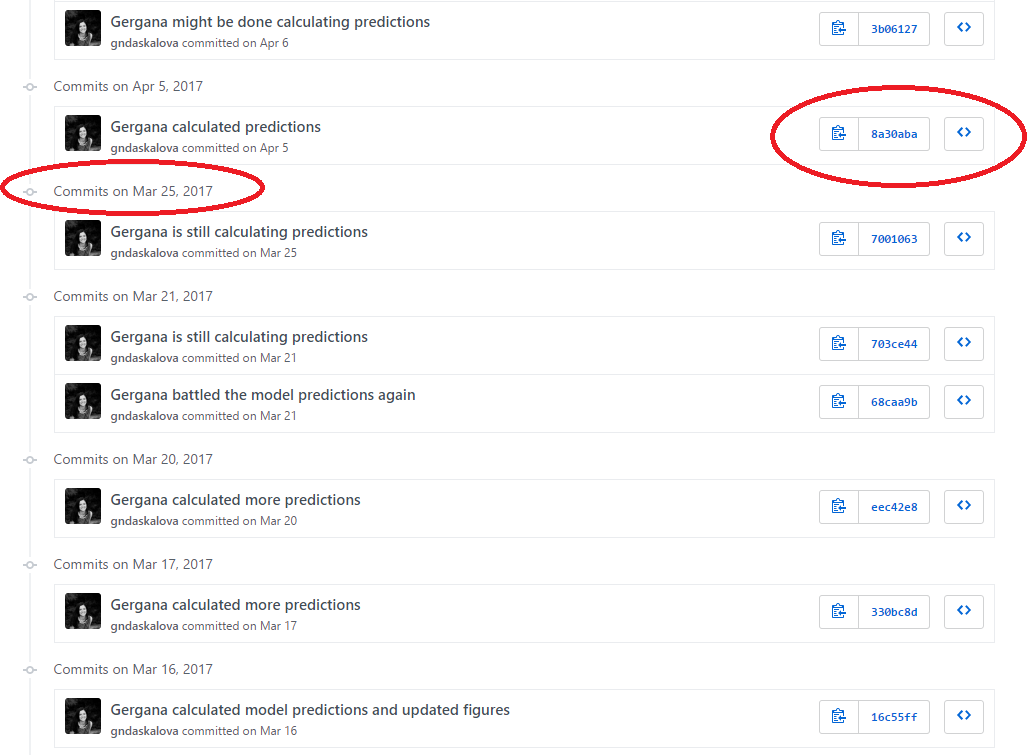
Each file on GitHub has a history, so instead of having many files like Dissertation_1st_May.R, Dissertation_2nd_May.R, you can have only one and by exploring its history, you can see what it looked at different points in time.
For example, here is the history for a script. Obviously it took me a while to calculate those model predictions!
Get lab members to register on GitHub
To get started with GitHub and version control, please get each lab member to register on the Github website and download and install Git for their operating system.
Register an organisational GitHub account for the lab
Once you are logged in with your personal account, you can register an organisational GitHub account for the lab. The files you put on GitHub will be public (i.e. everyone can see them & suggest changes, but only the people with access to the account can directly edit and add/remove files). You can also have a private organisational account on GitHub, which means that only lab members can see the files. GitHub offers free private organisational accounts for educational purposes, and you can apply for one using this link.
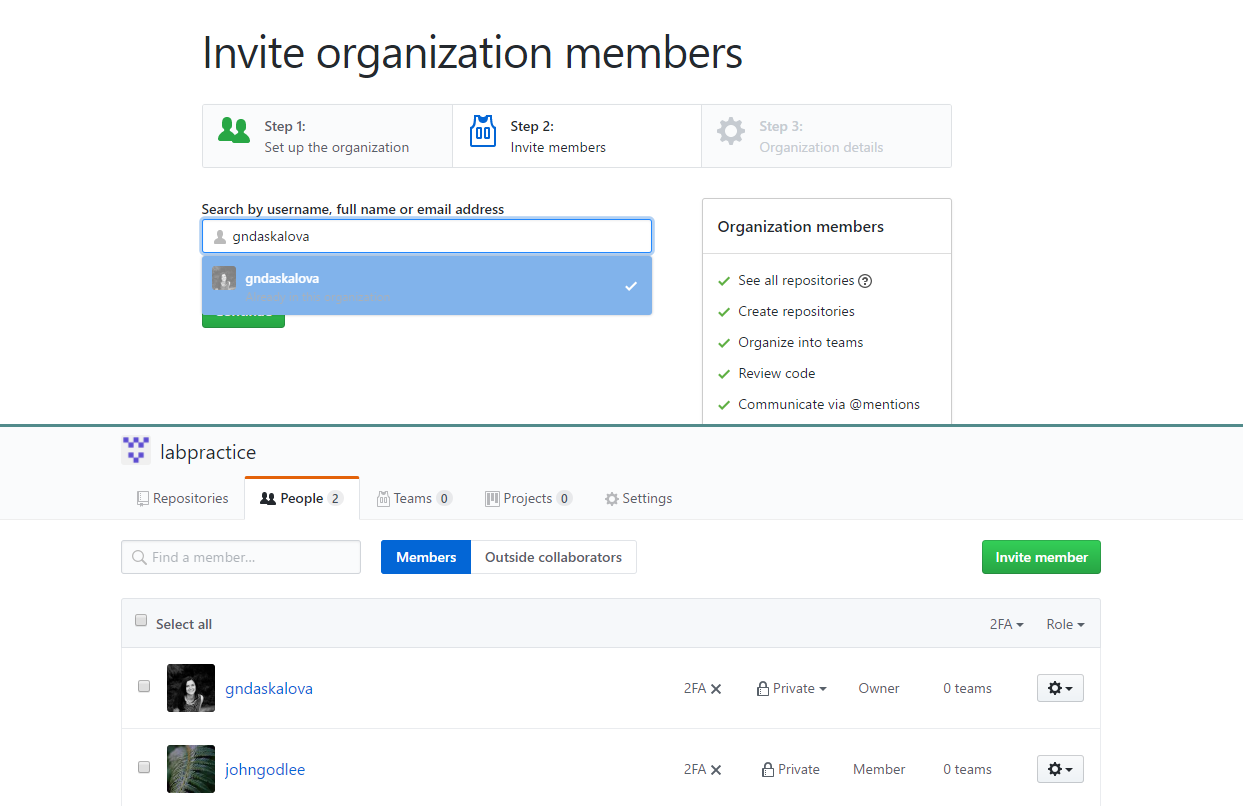
Add lab members as members of the lab’s organisational GitHub account
Once all lab members are registered on GitHub and you have set up the lab’s organisational account, you can add lab members to the list of people who have access to the lab’s account. You can then decide what sort of privileges you grant users. Users can either be members, i.e. they can see all other members, can be granted access to repositories, and can also create new teams and repositories, or they can be owners with full administrative rights to the organization and have complete access to all repositories and teams. After the admin has sent out invitations to lab members, they will receive an email notification with a link to accept them. You can use the Members tab to see members, add new ones, and change their rights.
2. Organise your lab repository
What is a repository?
GitHub uses repositories - you can think of a repository (aka a repo) as a “master folder” - a repository can have folders within it, or be just separate files. In any case, a repository is what holds all of the files associated with a certain project, or in this case a certain lab’s work.
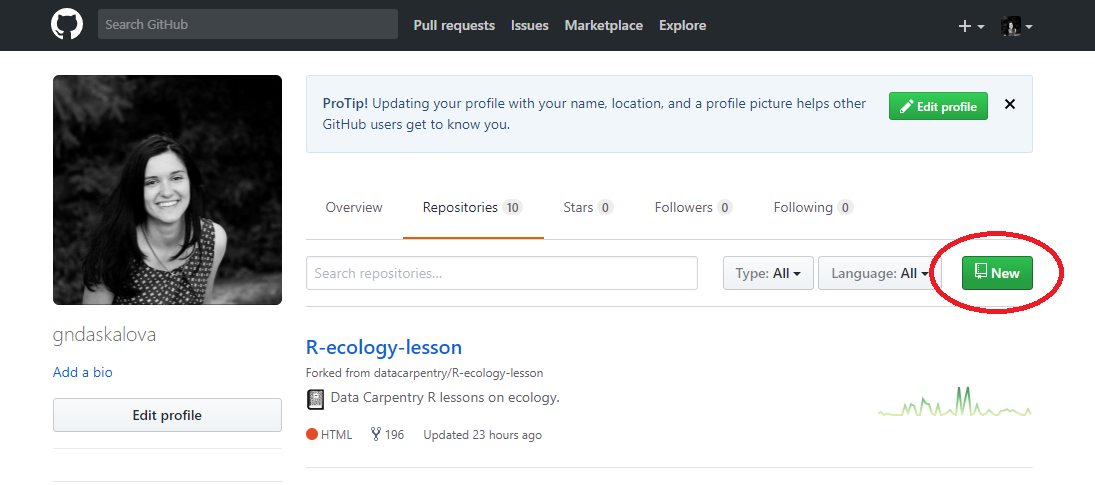
To make a repository, go to Repositories/New repository - choose a concise and informative name that has no spaces or funky characters in it. This can be your master repo that holds together past and ongoing research, data, scripts, manuscripts. Later on you might want to have more repositories - e.g. a repository associated with a particular project that you want to make public or a project where you are actively seeking feedback from a wide audience. For now, we will focus on organising and using the lab’s main repository that holds the files for all the lab’s work. Github now offers free private repositories as standard with up to three collaborators, so you can choose whether you want your repository to be open to public viewing or not.
Click on Initialise repo with a README.md file. It’s common practice for each repository to have a README.md file, which contains information about the project/lab group, what is the purpose of the repository, as well as any comments on licensing and data sources. Github understands several text formats, among which .txt and .md. .md stands for a file written in Markdown - you might have used Markdown before from within RStudio to create neatly organised reports of your code and its outputs (you can also check out our Markdown tutorial). You can also use Markdown to write plain text files, for example the file you are reading now was written in Markdown.

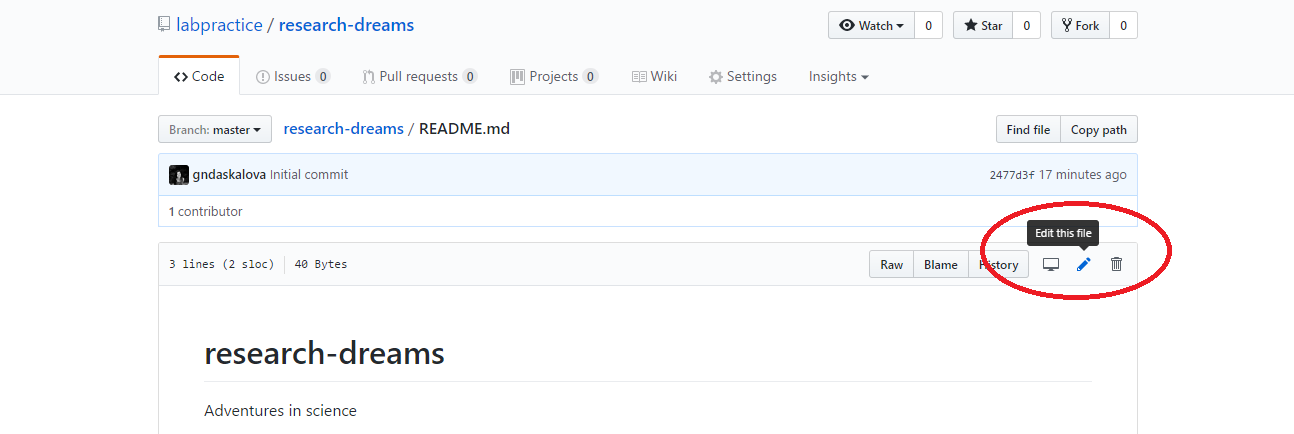
You can directly edit your README.md file on Github by clicking on the file and then selecting Edit this file.
Exercise 1: Write an informative README.md file
You can now write the README.md file for your lab’s repository. To make headings and subheadings, put hashtags before a line of text - the more hashtags, the smaller the heading will appear. You can make lists using - and numbers 1, 2, 3, etc.. You can discuss the information you want to include among your lab members - here are some things you might want to consider:
- Lab name, lab members, link to website & social media links, contact details

- What rights do different users have - e.g. can everyone make new folders/delete files?

- Who can add new members?

- Will there be personal folders? Can other people look in them?
Exercise 2: Writing a .gitignore file
You might have noticed a file called .gitignore - in this file you specify which files you want Git to ignore when users make changes and add files. Examples include temporary Word, Excel and Powerpoint files, .Rproj files, .Rhist files etc. Go to Create new file and write a .gitignore file within the main repository for the lab (not any of the folders within it). You need to call the file .gitignore and then add the types of files that Git should ignore on separate lines. You can make this specific to your lab’s needs, but as a start, you can copy over this code:
# Prevent users to commit their own RProject
.Rproj.user
.Rproj
# Prevent users to commit their own .RData and .Rhistory in mutual area
.RData
.Rhistory
.Rapp.history
# Temporary files
*~
~$*.doc*
~$*.xls*
*.xlk
~$*.ppt*
# Prevent mac users to commit .DS_Store files
*.DS_Store
# Prevent users to commit the README files created by RStudio
*README.html
*README_cache/
#*README_files/
Exercise 3: Create folders
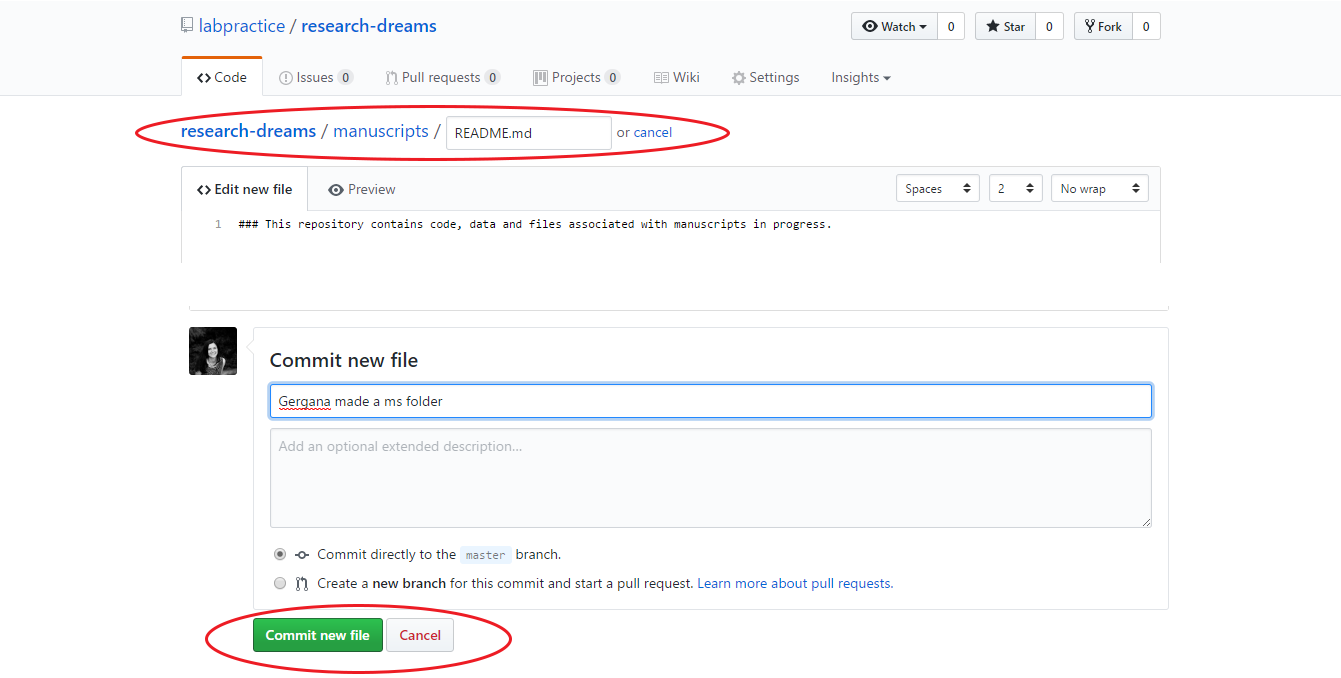
Discuss among your lab what folders your repository will contain - some examples include: manuscripts, data, figures, scripts, scripts/users/personal_folder_your_name. To make a new folder, click on Create new file and add in the name of your new folder, e.g. manuscripts/ before the file name, in this case a quick README.md file. When creating folders within your repo through GitHub’s website, you always need to make at least one file associated with them, you can’t just create an empty folder. Add a brief explanation of what the folder is for in the README.md file, scroll down and click on Commit new file. Add a quick message where it says Create README.md file in light grey text - we will cover GitHub etiquette later, but for now, when creating/editing files, it’s always a good idea to change the default message to a more precise description of what was done and who did it. Stick with the default option of Commit directly to master branch - we will explain branches and pull requests at a later stage of the tutorial.
(In new repositories in GitHub, the default branch is now called main instead of master. There will be no difference in functionality.)
Create a github-workshop folder within your main lab repo - this is where we will be working for the purposes of this workshop to practice using GitHub for version control and collaborative coding.
Once all lab members are synced with GitHub through RStudio, everyone can make folders and add files using their File Explorer and once they have gone through commit-pull-push, all the added folders/files will be up on GitHub, too. Note that you can’t push empty folders.
3. GitHub etiquette
It’s a good idea to define some rules on how to use the lab’s repository before we start working within it - for example what GitHub and coding etiquette should lab members be following? We can make a new github-etiquette.md file that outlines the rules lab members agree on.
Exercise 4: Write a github-etiquette.md file
Go to your lab’s main repository, click on Create new file and add github-etiquette.md as a file name. Remember to include the file extension .md - otherwise GitHub won’t know what’s the file format.
Here is a set of sample GitHub rules:
Keep your scripts in your personal scripts folder. Don't look in other people's folders.
When working on group projects, move the script out of your personal folder to the relevant project folder, so that everyone can work on it.
Keep file paths short and sensible.
Upload your data on GitHub and use relative file paths - if the data are on your computer, and you have e.g. `data <- read.csv("C:/user/Documents/bird_abundance.csv")` in your code, only you will be able to read in that data, since it's only on your computer. But if you load the data from the lab's repo, every member of the lab can use it, e.g. `data <- read.csv("data/bird_abundance.csv")`, where `data` is a folder within the lab's repo.
Don't use funky characters and spaces in your file names, these cause trouble because of differences in Mac/Windows systems.
Always pull before you push in case someone has done any work since the last time you pulled - you wouldn't want anyone's work to get lost or to have to resolve many coding conflicts.
Coding etiquette
Similarly to a GitHub etiquette, it’s useful to agree upon a set of coding etiquette rules that lab members strive to follow, so that the code within the repo is organised and easy to use.
Exercise 5: Write a coding-etiquette.md file
Discuss what to include in your coding etiquette file among lab members and write the file - here are some ideas:
Is there a certain script format you all could use - e.g. what are the sections each script should include (e.g. libraries, load data, functions, figures) and in what order should they appear?
What syntax etiquette will lab members aim to follow?
“There are only two hard things in Computer Science: cache invalidation and naming things.” - Phil Karlton
Script file names should be meaningful and end in .R, e.g.:
farmland_figures_Feb2016.R  # Alright.

farmland_figures_2017-02-25.R  # Some people prefer this date format.

yet_another_script.R  # Bad. Took me hours to find the file when I needed it one year later.
Object names should be concise and meaningful.
- Calling your data
datamight cause problems if you are doing multiple analyses at once / don’t clean your environment, and you keep using the same object name. But if you need an overwrittable universal object and you don’t need to keep lots of objects from each step of your analysis, sticking with the same object name might be useful. - Long object names are annoying to type - more letters, higher chance you’ll make a typo.
- Variable and function names should be lowercase.
- Variable names should be nouns and function names should be verbs.
- Use an underscore to separate words within a file.
- Use a dot to separate words within objects and functions.
This way it’s clear what’s an object and what’s an external file.
The preferred form for variable names is all lower case letters and words separated with dots (variable.name). Function names have lowercase letters and words are separated with dots (function.name).
Spacing around infix operators (=, +, -, <-) - should there be spaces?
Line length - how long should a line of code be?
The official convention is to limit your code to 80 characters per line. Having to continuously scroll left and write can be annoying and confusing. Also, when you publish your code on Github, the scrolly bar is all the way down, so to scroll right, you first need to scroll all the way down, scroll right, then scroll all the way up to wherever you want to be - unnecessary.
How do you know what’s 80 characters though? RStudio can place a handy line in your editor as a reminder! Go to Tools/Global Options/Code/Display/Show Margin/80 characters. Sometimes it might make more sense for your code to be a bit longer than 80 characters, but in general code is easier to read if there is no need for continuous scrolling left and right.
When using pipes, keep the piping operator %>% at the end of the line and continue your pipe on a new line.
When using ggplot2, keep the + at the end of the line and continue adding on layers on a new line.
Here is a before and after of a ggplot2 figure code:
plot <- ggplot()+geom_hline(yintercept=0,linetype="dotted",colour="darkgrey")+
  geom_line(data=cwa.sub, aes(x=Season,y=Total.Concentration),size=2,alpha=0.2)+
  geom_ribbon(data=preds2, aes(x=Season, ymin=ploBT, ymax=phiBT), fill="#3cd0ea", alpha=0.3)+
  geom_line(data=preds2,aes(x=Season,y=Total.ConcentrationBT),colour="#3cd0ea",size=3)+theme_bw()+ylab("Minimum Sea Ice Concentration")+xlab("Season")+annotate("text",x=2012,y=0.4,label=paste0("p = ",round(pval.cwa.sub,4)),size=6)+theme(legend.title=element_text(size=20,face="plain",hjust=1),legend.text=element_text(size=18,angle=45),legend.position="bottom",legend.key =element_blank(),axis.title.x=element_text(size=20,margin=margin(20,0,0,0)),axis.title.y=element_text(size=20,margin=margin(0,20,0,0)),axis.text=element_text(size=16),panel.grid.minor=element_blank(),panel.grid.major=element_blank())

(plot <- ggplot() +
  geom_hline(yintercept = 0, linetype = "dotted", colour = "darkgrey") +
  geom_line(data = cwa.sub, aes(x = Season, y = Total.Concentration), size = 2, alpha = 0.2) +
  geom_ribbon(data = preds2, aes(x = Season, ymin = ploBT, ymax = phiBT), fill = "#3cd0ea", alpha = 0.3) +
  geom_line(data = preds2, aes(x = Season, y = Total.ConcentrationBT), colour = "#3cd0ea", size = 3) +
  theme_bw() +
  labs(y = "Minimum Sea Ice Concentration", x = "Season") +
  annotate("text", x = 2012, y = 0.4, label = paste("p = ", round(pval.cwa.sub,4)), size = 6) +
  theme(legend.title = element_text(size = 20, face = "plain", hjust = 1),
        legend.text = element_text(size = 18, angle = 45),
        legend.position = "bottom",
        legend.key = element_blank(),
        axis.title.x = element_text(size = 20, margin = margin(20,0,0,0)),
        axis.title.y = element_text(size = 20, margin = margin(0,20,0,0)),
        axis.text = element_text(size=16),
        panel.grid.minor = element_blank(),
        panel.grid.major = element_blank()))
Also, remember that putting your entire ggplot code in brackets () creates the graph and then shows it in the plot viewer. If you don’t have the brackets, you’ve only created the object, but haven’t visualized it. You would then have to call the object such that it will be displayed by just typing plot after you’ve created the “plot” object.
Code chunks
If your code is many, many lines (as it usually is!), it would be easier for you and everyone who might need to read and use it, to split it into different sections. To do that, add in four or more dashes after your comments - you will see a little arrow appear next to that line of code and you will be able to collapse and expand the code chunk based on your needs.
Organise your chunks in a logical order, so that your code flows nicely.
Commenting guidelines
As an example of a lab’s coding etiquette, you can check out Team Shrub’s coding etiquette here.
For more details you can check out our Coding Etiquette tutorial.
4. Learn to use RStudio and Github together
We are now ready to start using our repository - first all lab members need to create a local (i.e. on their computers) copy of the repository and create an RStudio project for the lab’s repo.
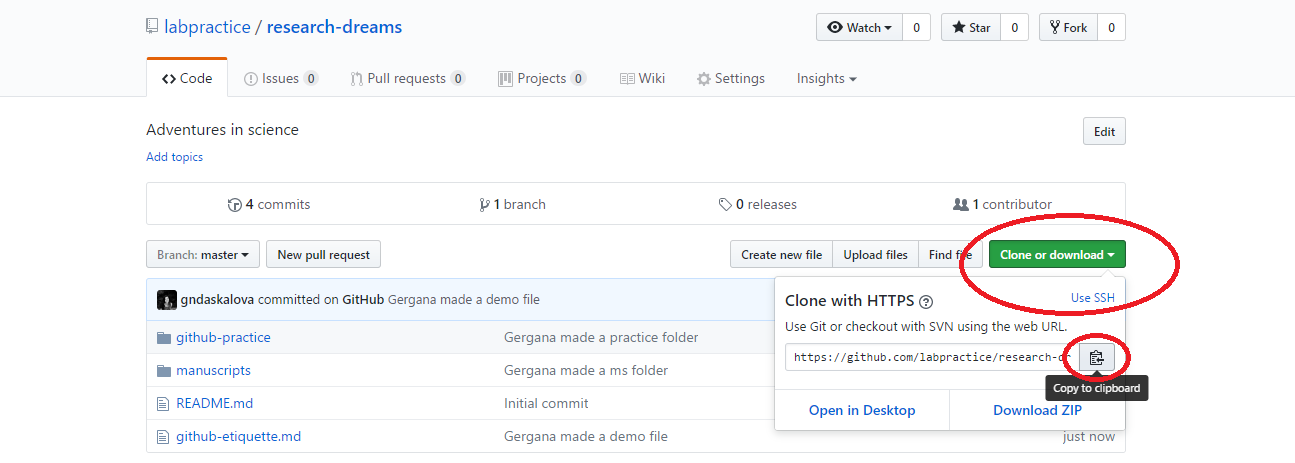
Click Clone or download and if you are on a Windows computer, copy the HTTPS link (that’s the one that automatically appears in the box). If you have a Mac, click Use SSH and copy that link.
Now open RStudio, click File/ New Project/ Version control/ Git and paste the link you copied from Github. Select a directory on your computer - that is where the “local” copy of your repository will be (the online one being on Github).
On some Macs, RStudio will fail to find Git. To fix this open the terminal and type sudo mv /usr/bin/git /usr/bin/git-system. Then open RStudio/ Preferences/ Git/SVN and change Git executable: to /usr/local/bin/git. Then restart RStudio and try again. More information can be found in the README.txt for the Mac git installer.
Once the files have finished copying across, you will notice that a few things about your RStudio session have changed:
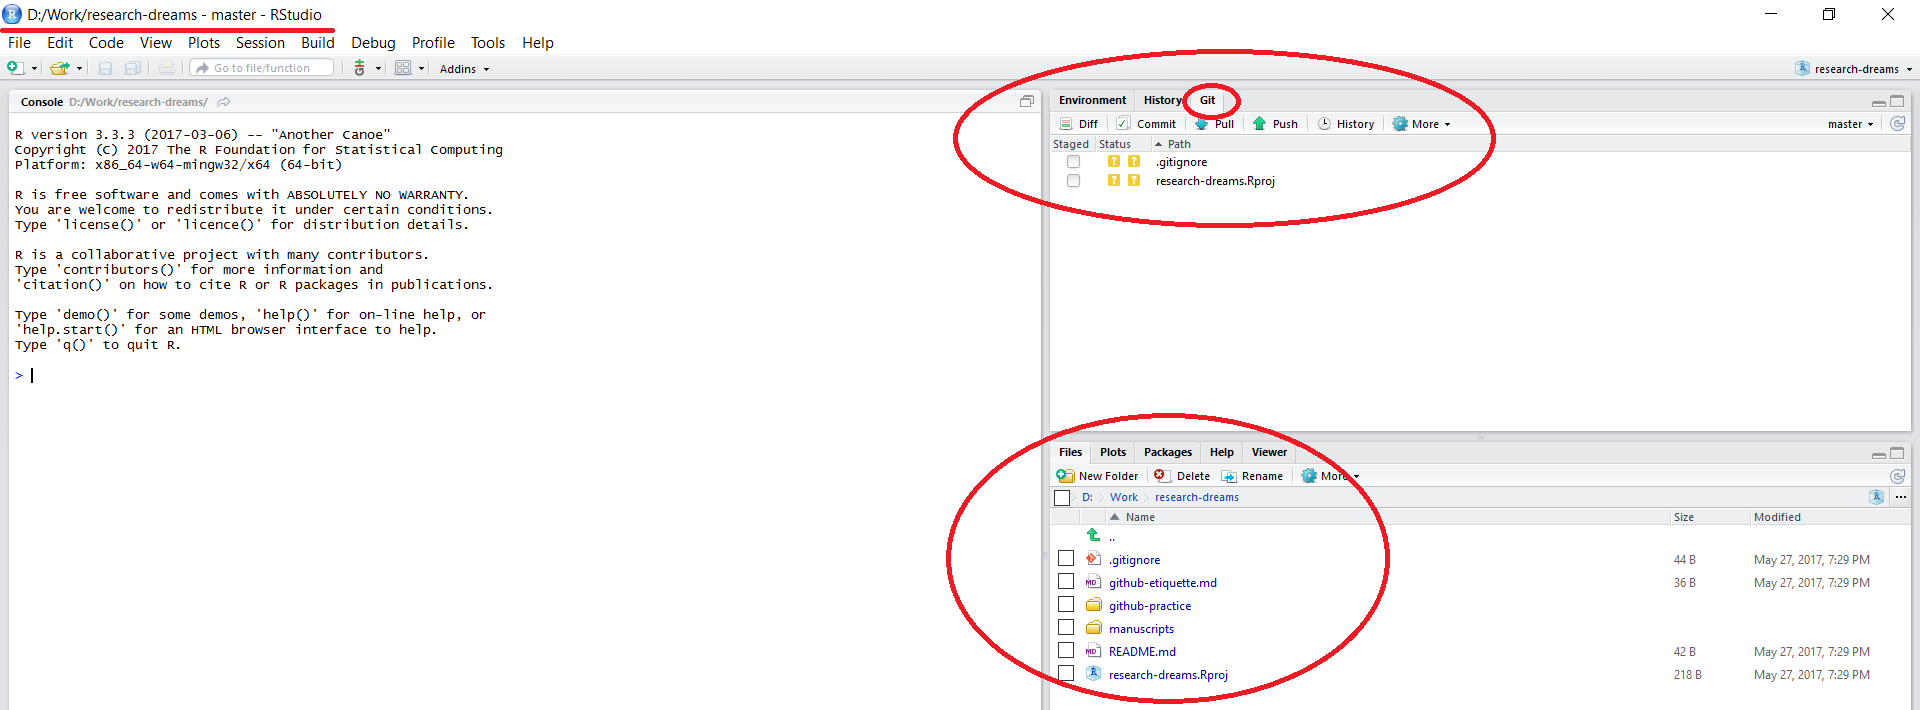
The working directory in the top left corner is set to your local copy of the lab’s repository. You can load in data using read.csv("data/your_file.csv") - this would load a .csv file in a folder called data within your lab’s repository - notice that there is no need to include the repository’s name - by setting up a RStudio project, you are already within it. Similarly, when saving files, you can specify the folder where you want them saved without the repository’s name.
There is a Git tab in the top right panel of RStudio. We will be doing our version control using the options within this tab.
All the files that were in the repository online are now on your computer as well.
GitHub in action
We will practice using GitHub as a lab by analysing data from the Living Planet Index.
The data and instructions are available from this repository. To get us all started, it would be easier if one person from the lab downloads the data and instructions and then uploads them to our new github-practice folder within the lab’s GitHub repository. Once that’s done, all the other lab members can pull and then everyone will have the files.
Click on Clone or download, Download ZIP and download and unzip the files from the repository. Copy the files and use your file explorer to navigate to your local copy of the lab’s repository - paste the files there. Now go back to the RStudio project you set up in RStudio earlier. You can now see the files you added under the Git tab - you need to commit-pull-push and then the data and instructions will be up online.
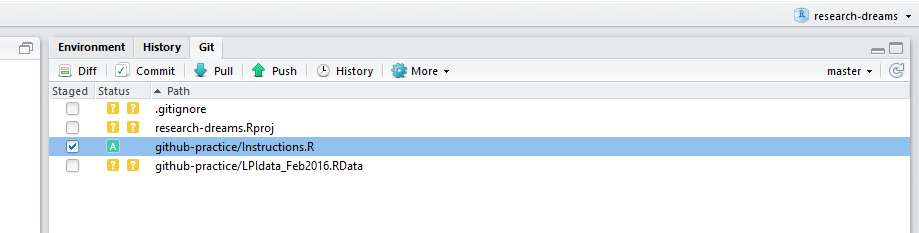
Tick both files - you will see an A appear (A is for added files, if the files were modified, it would have been M, and D is for deleted files). Now click on Commit and write an informative commit message - it’s useful to say who you are and what you’ve done - e.g. Gergana added the LPI data. Click on Commit - there will be a bit of loading and then you’ll get a message saying your files have been added. Click on Pull - someone might have been working in the repo and you want to make sure you have the most recent version before you push. Once you’ve pulled, click on Push - your files are now online!
Everyone else should go to the RStudio session where they have the lab’s GitHub repo project open. Click on Pull in the Git tab in the top right corner - you are now up to date and have the files necessary to complete the coding challenges ahead!
Challenges & collaborative coding
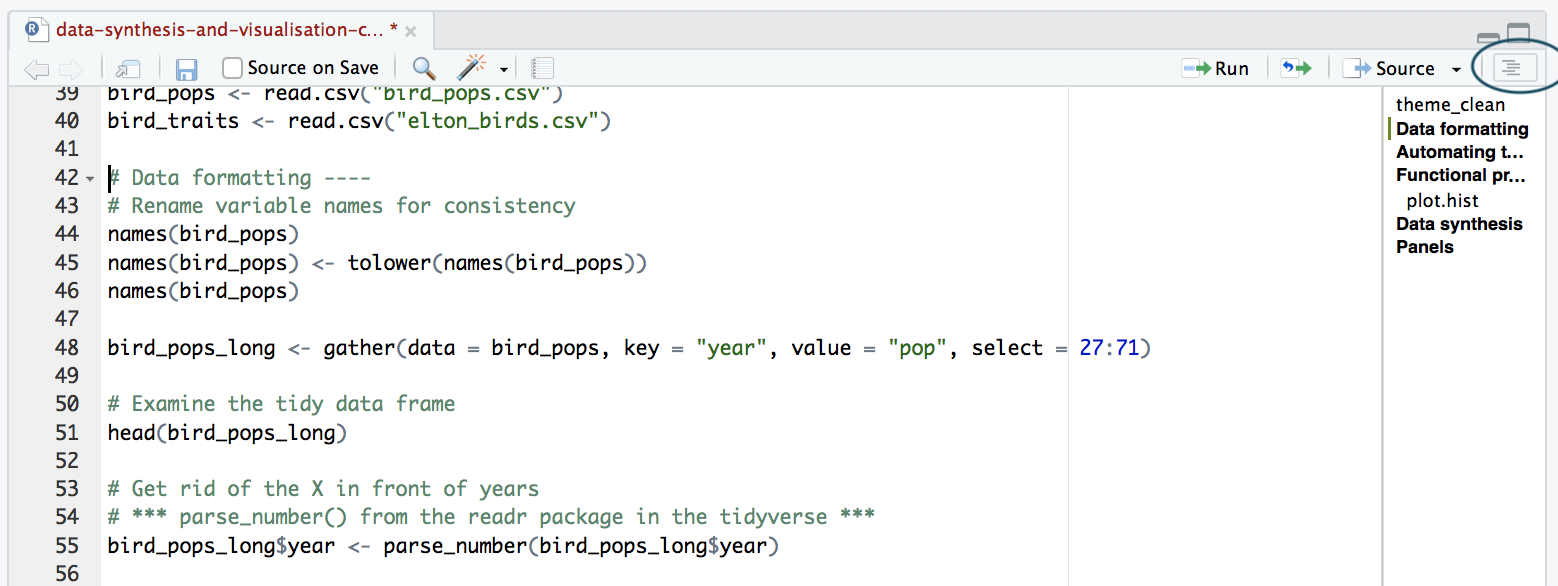
Open the Instructions.R file and follow along - if you get stuck you can check out the Answers.R file. The file includes several challenges - split in small teams with each team tackling one challenge - once a team completes a challenge, they can commit, pull and push!
Notice that the Instructions.R file has different sections - you can click on Edit/Folding/Collapse all to see only heading titles and you can enable the outline feature as well to navigate easily to certain sections. Please run all code before the start of the challenges and then only work on your challenge, ignoring the rest!
Go back to your repository on Github, where you can now see all of your files (your new plots included) online. You can click on the Instructions.R file which should now have been modified by several people - you can click on History to see what everyone has done.
Happy coding!
Potential problems
Sometimes you will see error messages as you try to commit-pull-push. Usually the error message identifies the problem and which file it’s associated with, if the message is more obscure, googling it is a good step towards solving the problem. Here are some potential problems that might arise:
Code conflicts
While you were working on a certain part of a script, someone else was working on it, too. When you go through commit-pull-push, GitHub will make you decide which version you want to keep. This is called a code conflict, and you can’t proceed until you’ve resolved it. You will see arrows looking like >>>>>>>>> around the two versions of the code - delete the version of the code you don’t want to keep, as well as the arrows, and your conflict should disappear.
Pushing the wrong files
If you accidentally push not what you intended, deleted many things (or everything!) and then pushed empty folders, you can revert your commit. You can keep reverting until you reach the point in time when everything was okay.
5. Git in the command line
Traditionally, Git uses the command line to perform actions on local Git repositories. In this tutorial we ignored the command line but it is necessary if you want more control over Git. There are several excellent introductory guides on version control using Git, e.g. Prof Simon Mudd’s Numeracy, Modelling and Data management guide, The Software Carpentry Guide, and this guide from the British Ecological Society Version Control workshop. We have also created a neat cheatsheet with some basic Git commands and how they fit into the git/github ecosystem. A couple of the commands require hub a wrapper for Git that increases its functionality, but not having this won’t prevent you using the other commands:
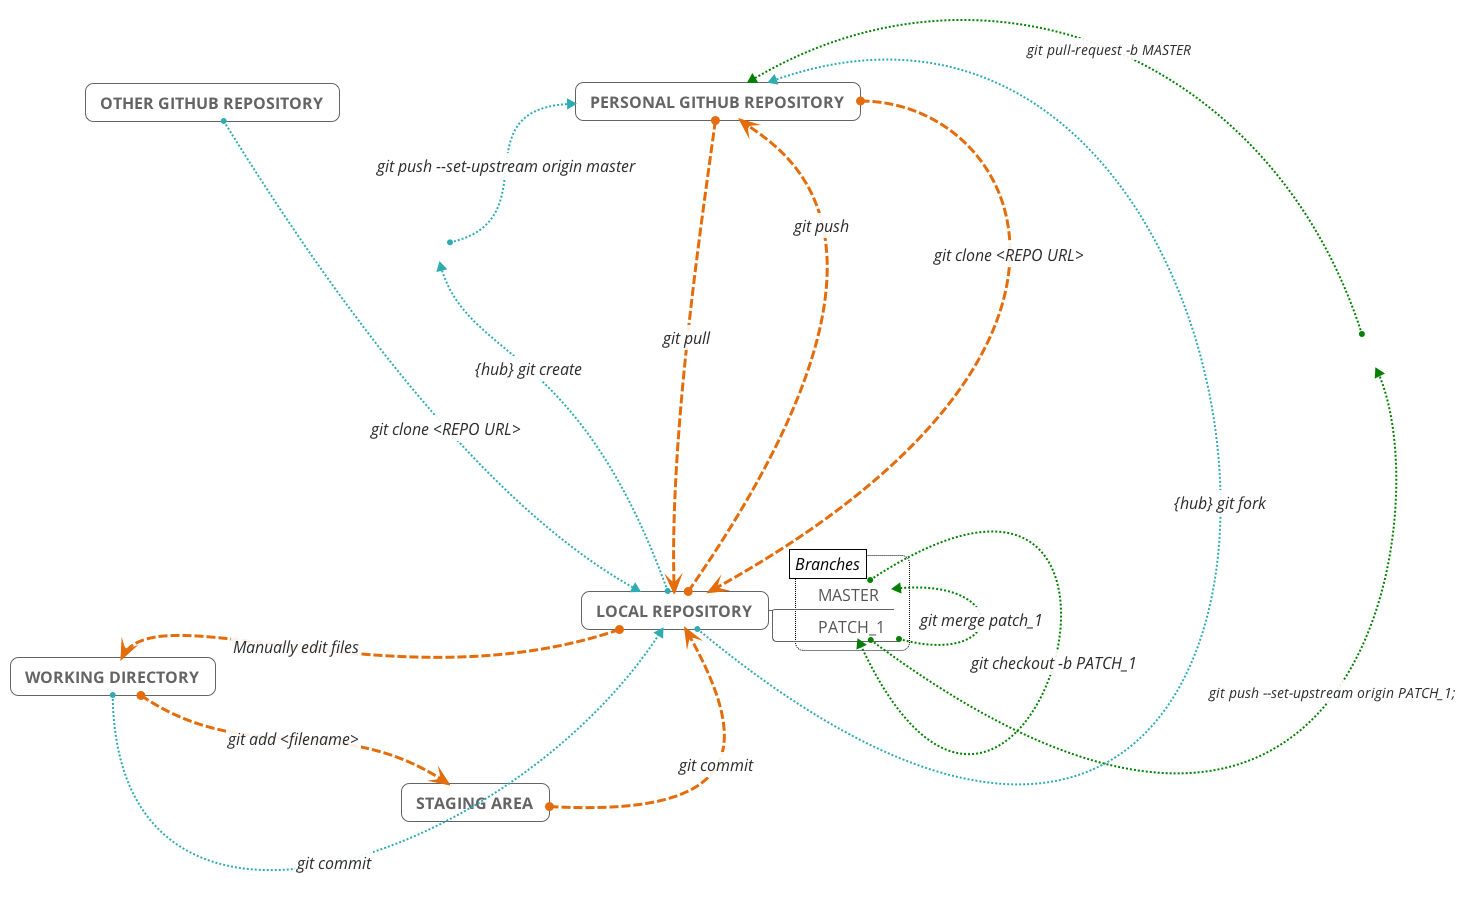
| Command | Is `hub` required? | Origin | Destination | Description |
|---|---|---|---|---|
| `git fork` | Y | Other Github | Personal Github | Creates github repo in your personal account from a previously cloned github repo. |
| `git clone git@github.com:user/repo.git` | N | Personal Github | Local | Creates a local copy of a github repo called "repo" owned by the user "user". This can be copied from github.com. |
| `git add README.md` | N | Working Dir | Staging Area | Add "README.md" to staging area. |
| `git commit -m "Message"` | N | Staging Area | Local | Commits changes to files to the local repo with the commit message "Message". |
| `git commit -a -m "Message"` | N | Working Dir | Local | adds and commits all file changes to the local repo with the commit message "Message". |
| `git pull` | N | Personal Github | Local | Retrieve any changes from a github repo. |
| `git push` | N | Local | Personal Github | Sends commited file changes to github repo. |
| `git create` | Y | Local | Personal Github | Create a github repo with the same name as the local repo. |
| `git merge` | N | NA | NA | Merge any changes in the named branch with the current branch. |
| `git checkout -b patch1` | N | NA | NA | Create a branch called "patch1" from the current branch and switch to it. |